Let’s Talk NanoTags & Multi-Buy
So these hawt sticker trackers called Nanotags (by NanoThings) came on the market a few years ago. They have a little chip in ‘em, some memory, a battery, a temp sensor, and a printed antenna.
For those of you not native to just how rad IoT is, the curling "horns" at the top are the antenna, the large black square in the middle is the processor, the much smaller black square to the left of it is extra memory, the tiny silvery thing to the left of that is the "pharmaceutical grade" temp sensor, and the big silver square that takes up most of the bottom half is a flexible battery.
Hardware is so cool!
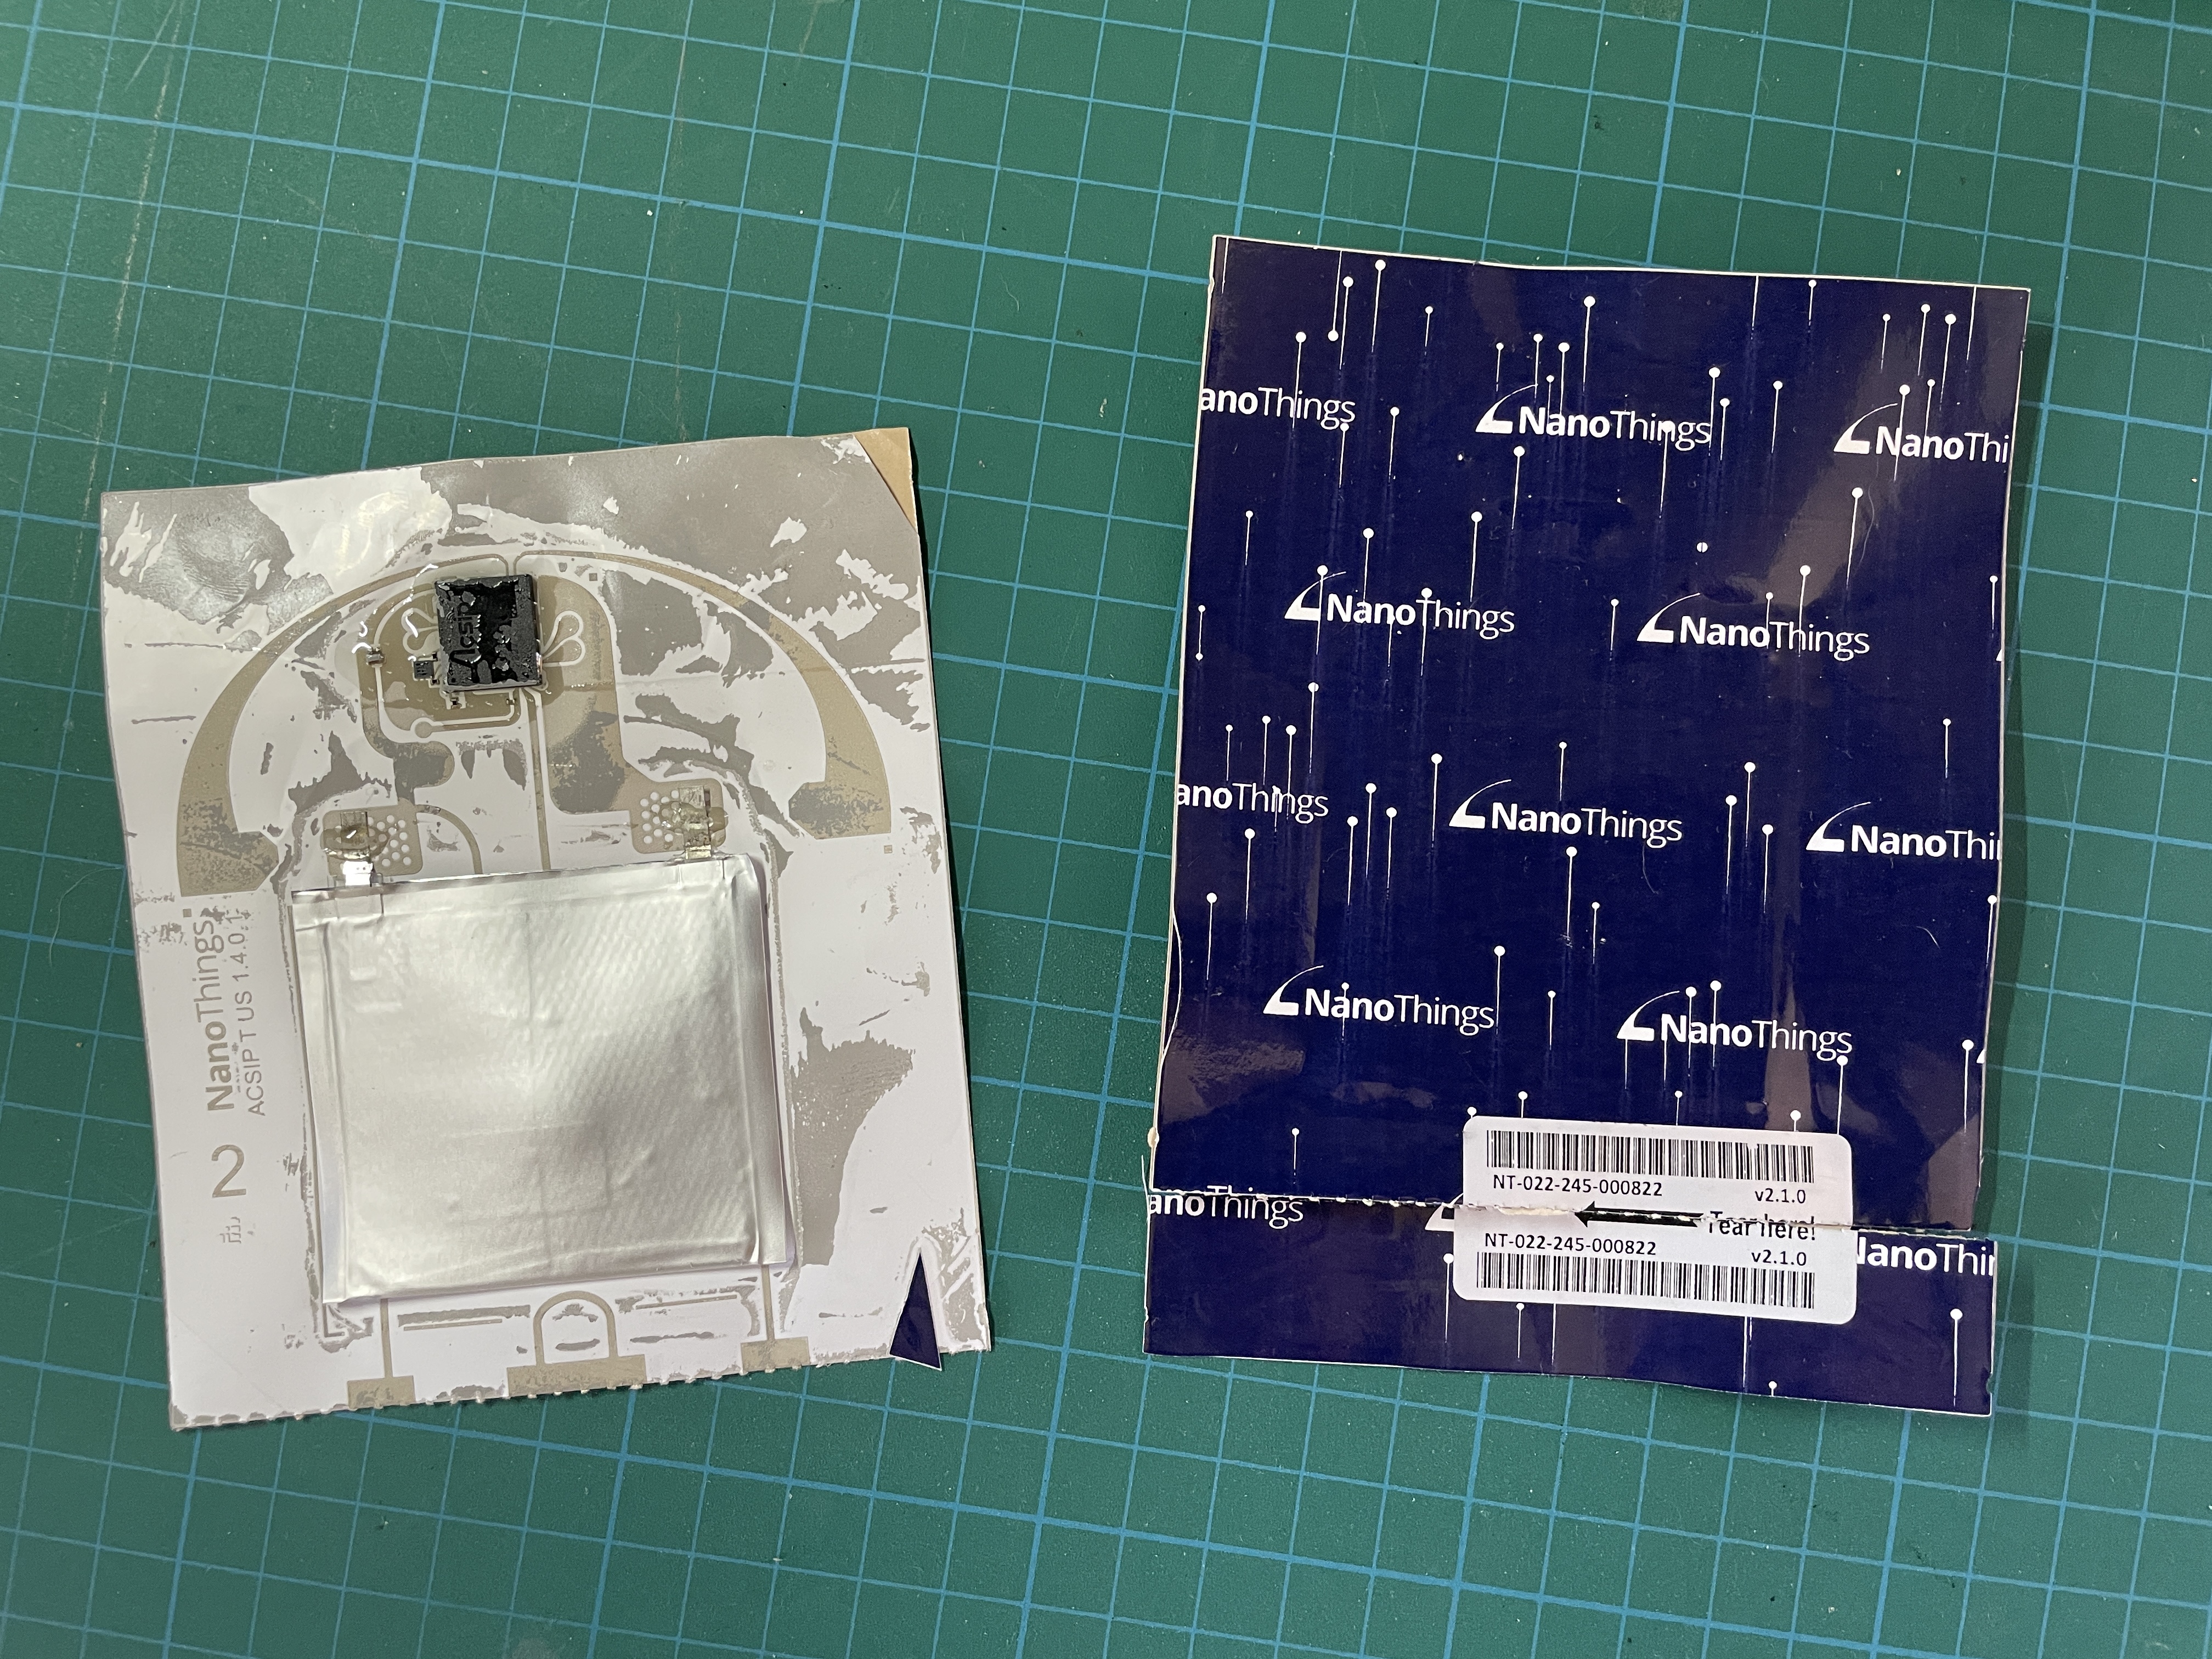
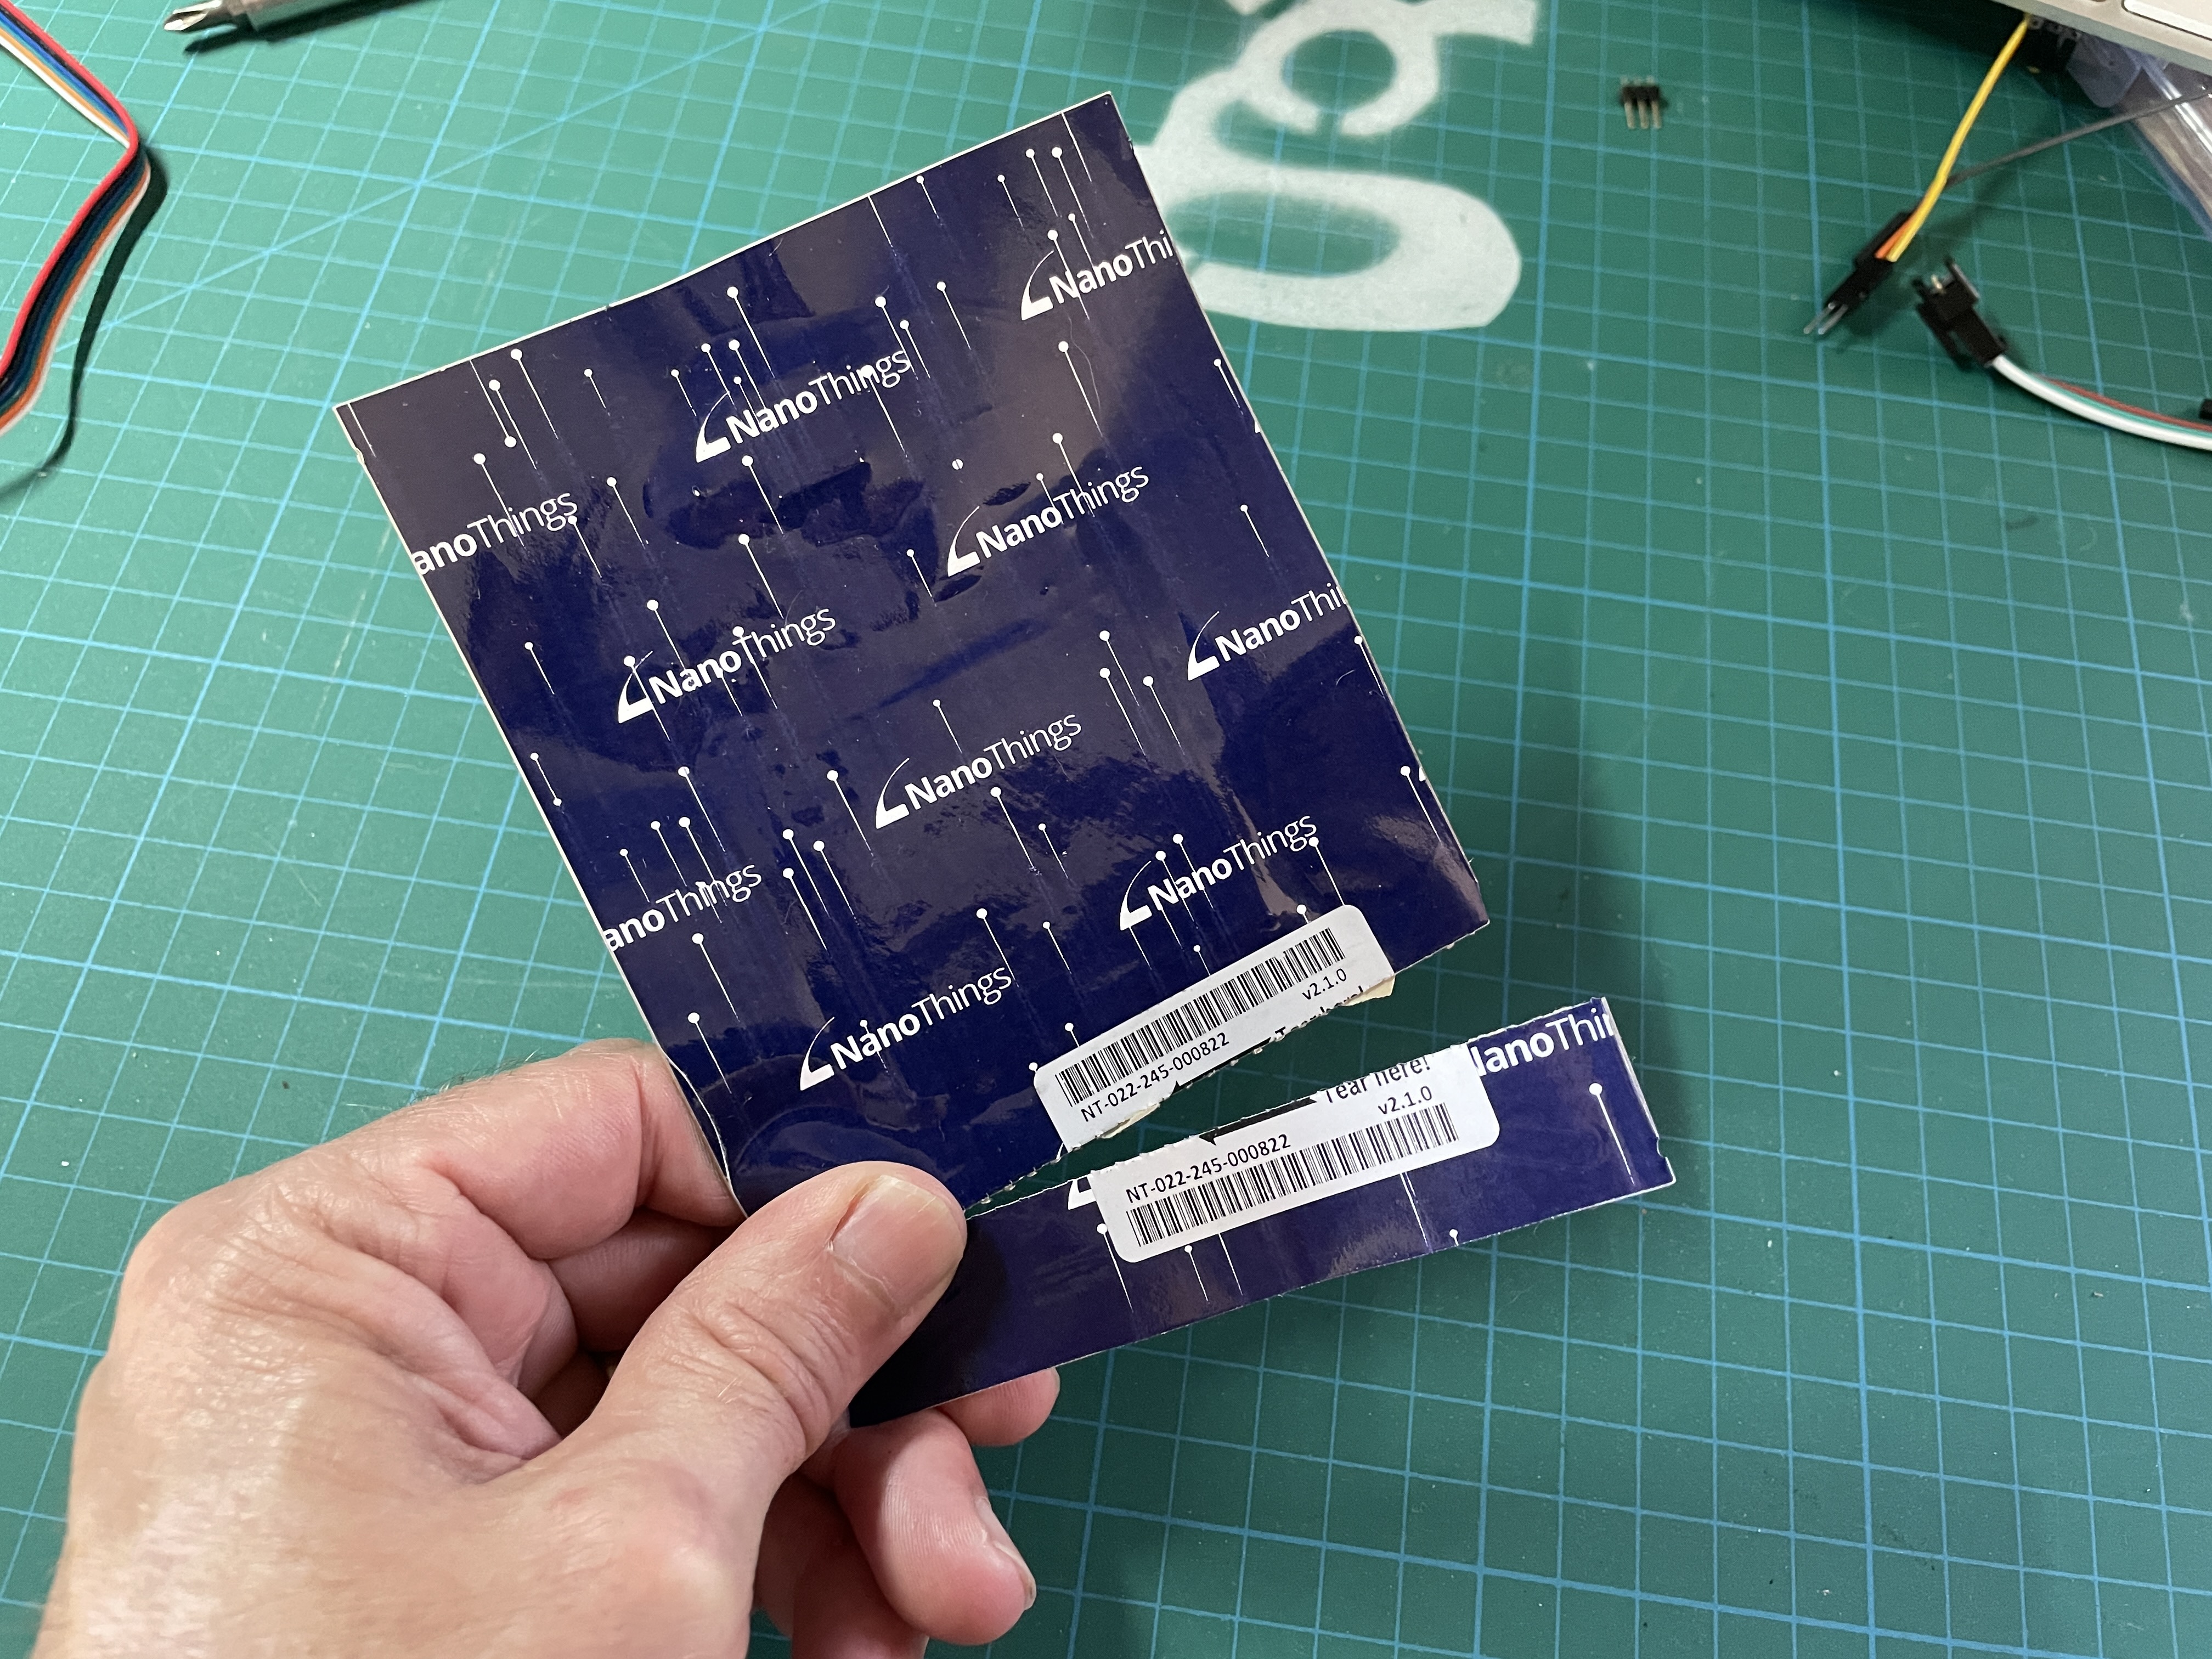
No buttons, no programming hookups, just tear off the bottom strip to activate and they start firing off packets through whatever LoRaWAN you want.
Obvi I chose Helium as my LoRaWAN, and MeteoScientific as my LNS. There is no network out there with greater coverage globally and it’s bloody cheap to use.
Since this is a SPECIAL PROJECT, I'll go through the whole thing from the beginning. By the end you'll be able to see approximately where your Nanotag is on a map, but it will NOT be with the precision of what you're used to with GPS/GNSS.
Since many of you are folks I've met and given a Nanotag to, and you may not be familiar with how the system works, let’s start with getting this thing onboarded.
Open a MetSci Console Account
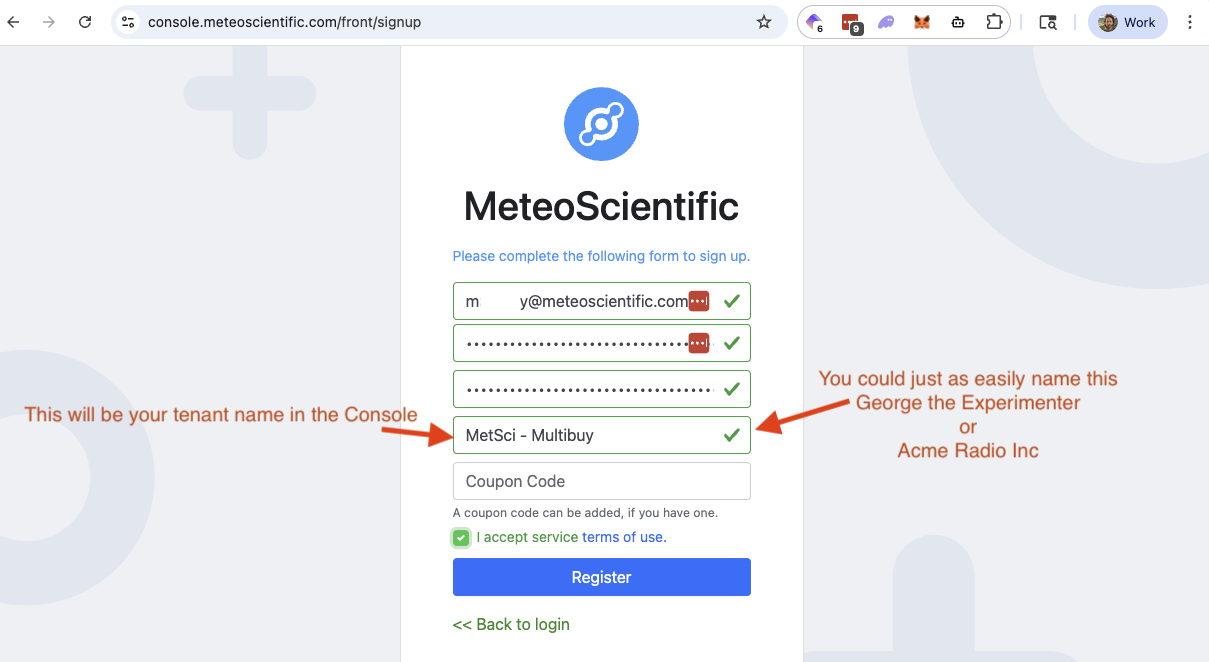
Start with opening up a MetSci Console account. Hit the big orange button to open it in a new tab.

You may already have a MetSci account for your other devices, but this one will have one important setting that will probably be different. We’re going to use multi-buy; more on that after we go through basic set up.
You’ll get an email to confirm sign up that says something like:
You just have requested to signup on GK Helium Console. This email is a confirmation of your request. To validate your registration, you need to follow this link to terminate the process:
Yeah, it’s kind of a funny way to say it, but terminate the process just means to finish it.
Hit the link, follow the directions, and you’ll see something like this:
Multi Buy - Secret Weapon Part 1
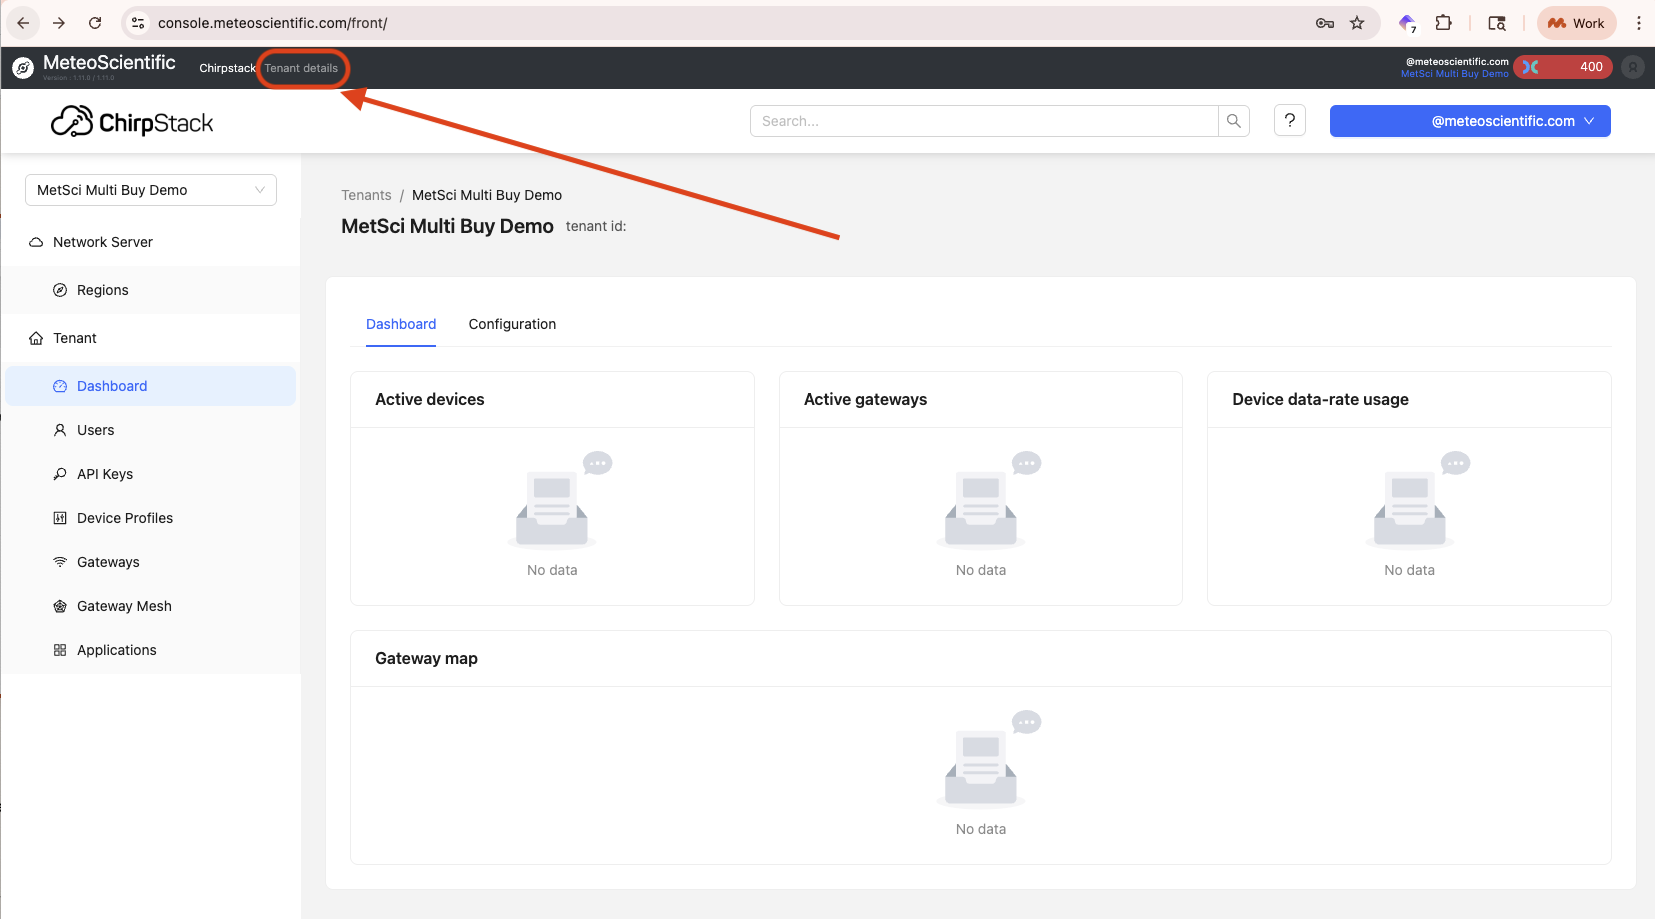
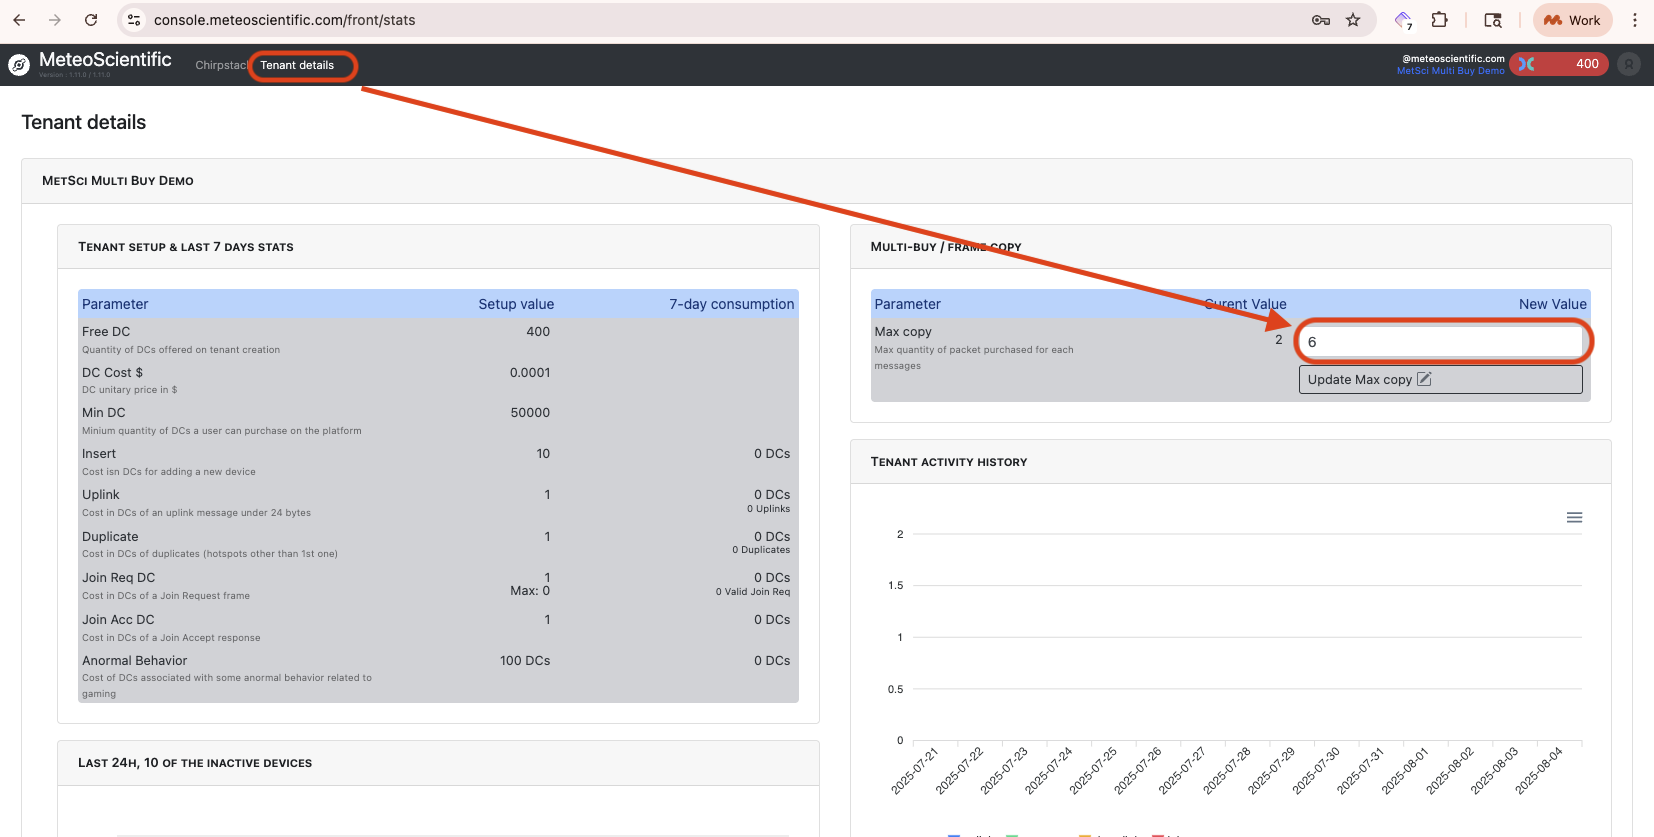
Go up to Tenant details and we’ll set up multi-buy. In a private console you could do this on a per Application basis, but due to the public and permissionless nature of the MetSci Console you can only set this per account/tenancy.
Multi-Buy means what it says; we're going to buy multiple copies of the same packet. We'll do this because we need to get data from multiple gateways, giving us a VERY rough idea of where our NanoTag is in relation to those gateways.
Multi Buy Settings
Go to Tenant Details in the top left, look for Multi-Buy on the right, and set it to 6. This means you'll buy the same packet from up to 6 different gateways. You can change this at any time.
Multi-Buy allows us to use a type of positioning called multi-lateration, which is well-known in the world of radio. Ham nerds will go "fox-hunting" to find a transmitter, meaasuring the signal strength and clarity from different locations to get a bunch of lines that converge at the transmitter location.
Multi Buy Cost
Using Multi-Buy for this project on one device will probably cost you just over $15/year if you're normal and maybe $75/year if you're insane. Maybe more if you're full-on batshit crazy, but there's no requirement for BSC.
How does it work? Every time you send an uplink (a radio transmission from the device to a gateway), it'll cost 6 Data Credits, or DC. It's 6 DC not 1 because we're buying 6 copies of the same 1 DC packet) in order to multi-laterate.
DCs on the MetSci Console are $0.0001 each, and each one covers up to 24 bytes of data. We're only sending a tiny bit of actual data each time — usually just a few bytes — so each message is well within that 24-byte limit.
You need to pre-load DCs, and once they're in there there are no refunds or transfers. Those aren't my rules, that's just how the Helium network works.
We'll talk a little bit more later about some advanced configurations to maximize your use of DCs, but for now we'll start with a standard set-up.
We're buying from up to 6 gateways per uplink because in multi-lateration you don't get a ton more accuracy beyond 6. You're welcome to set your Multi-Buy higher, but there's not a huge benefit from it and it'll just cost you more.
You could set it to less, like 4 or 5, but those will give much less accurate results.
Multi Buy Cost Calculator
So, how much will this cost you? Using the calculator tool below, set the following:
Payload Bytes: 6
Messages per Device per Day: 72
Multi-Buy: 6
This means you'll be buying from up to 6 gateways every 20 minutes (72 times per day).
You can change this frequency at any time, this gives you a reasonable starting point.
DC Calculator Tool
MeteoScientific Multi-Buy Cost Calculator
Add Your Device
With Multi-Buy set up, let's add your Nanotag to your new MetSci Console account and then configure it. We're going to add the device details to the Console BEFORE we activate the device; no need to tear the strip off the sticker yet.
Add Device Profile Template
Go to Chirpstack at the top left, then down to Device Profiles then Add Device Profile.
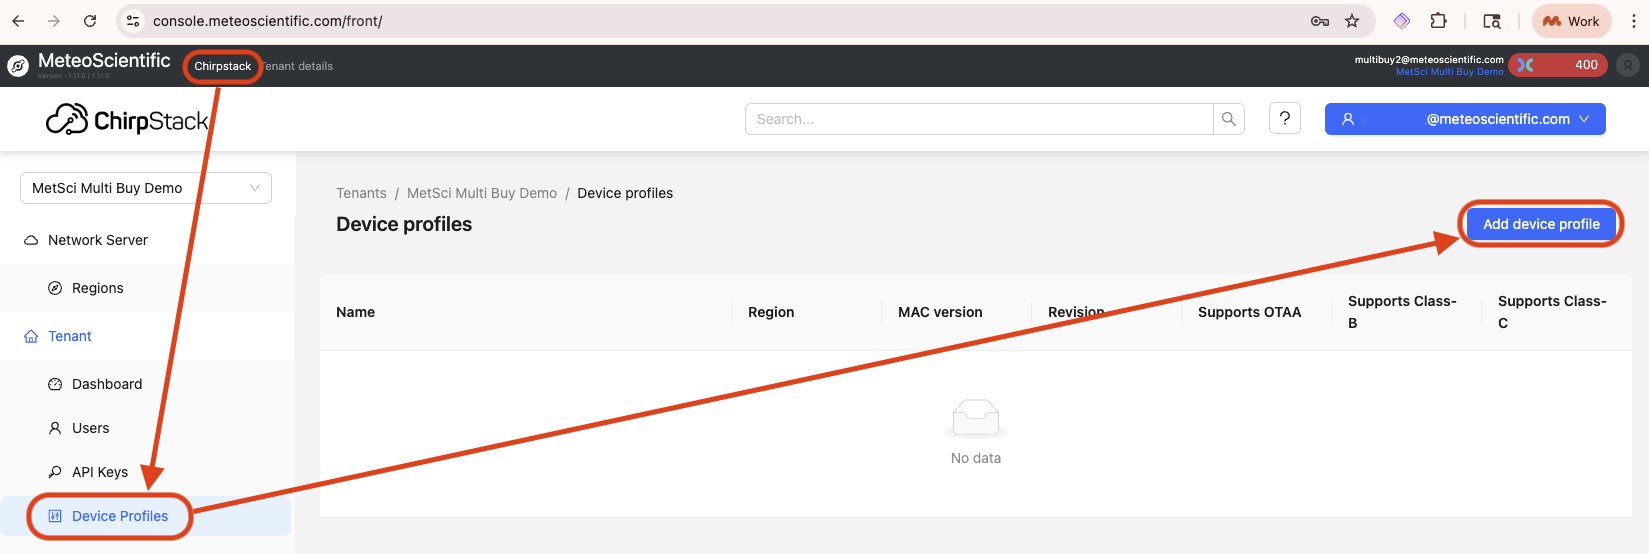
On the right side of the screen select Select device-profile template, then in the dropdown find Nanothings/Nanotag - US915 / FW Version: 1.4.0 / US915 and hit OK.
That'll fill in the Device Profile so you don't have to, including the codec (which you can see in the Codec tab if you really want to). When you're done poking around, hit Submit at hte bottom of the General tab.
Add Application
Now select Applications in the menu on the left, then look for Add Application on the right.
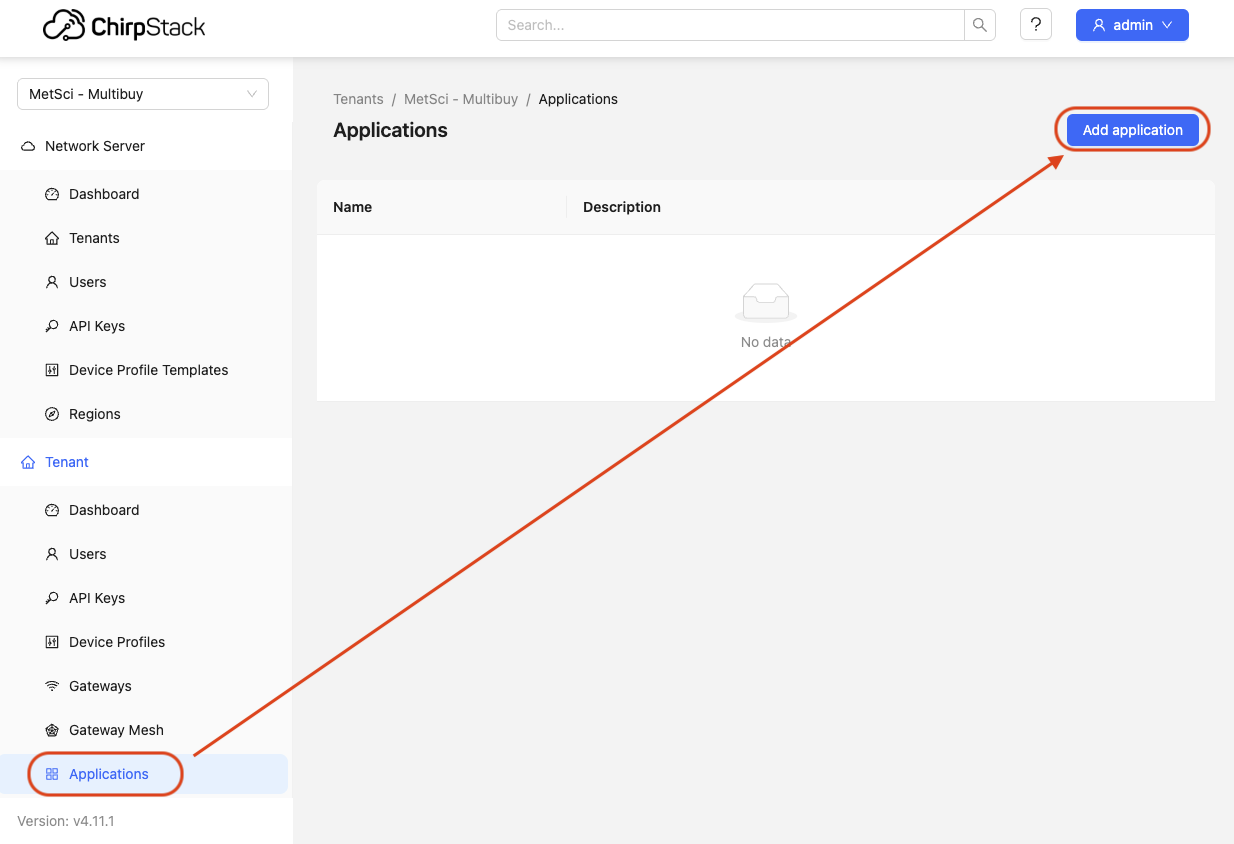
Name your application (I'll use NanoTag MapGrid) as my name for this project, but you can call your application whatever you want. Drop something in the description if you'd like, I usually write myself a little note and include any links, like this:
This is for seeing where my Nanotag is, I should be able to view it on mapgrid.ai.
More at meteoscientific.com/docs/special-projects/nanotags
Hit Submit.
Add Your NanoTag
Now you'll be back in Applications. Hit the Add device blue button on the top right and plug in a Name (I usually use the device name and then the last four of the S/N, in this case NanoTag 0820).
You'll need your Device EUI and JoinEUI. You should have those from wherever you got your Nanotag from.
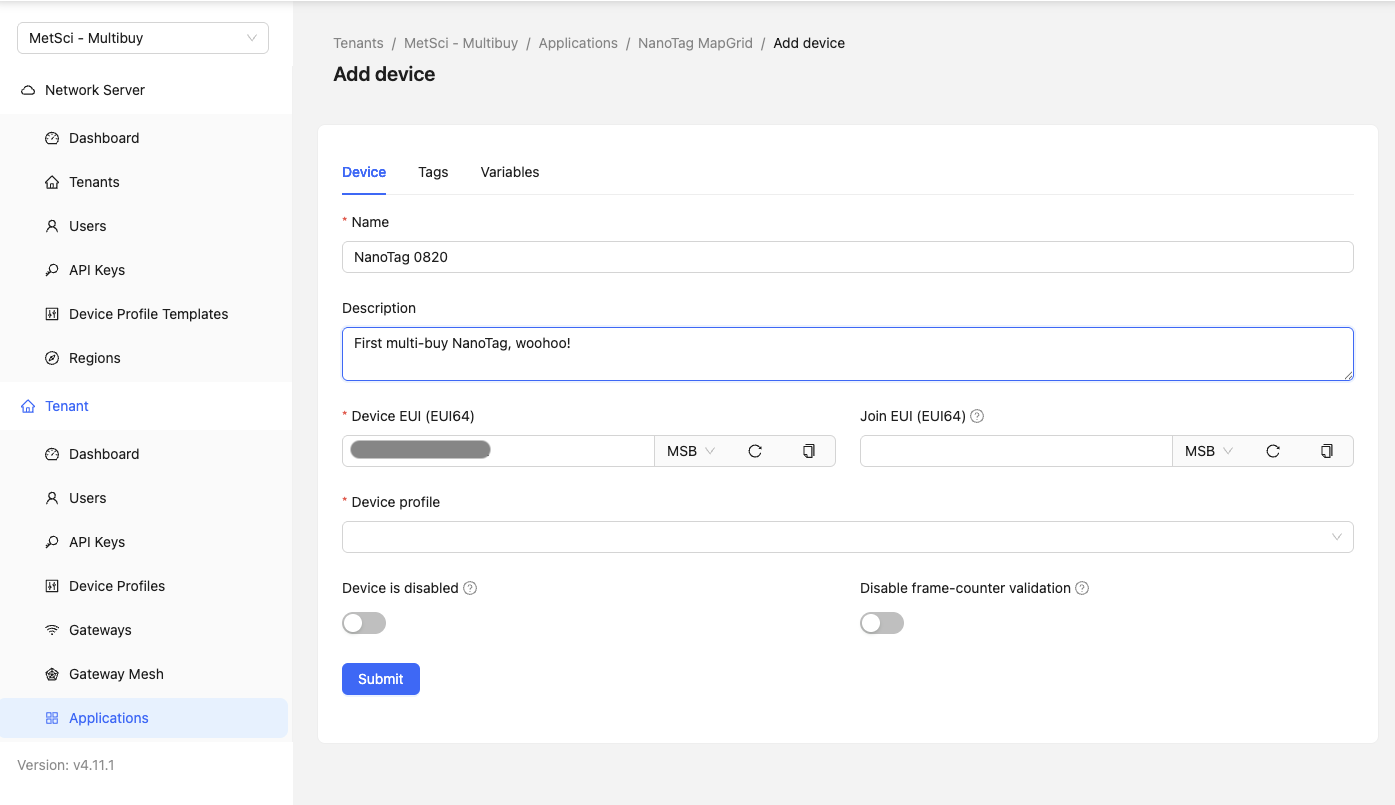
Enter that in, then in the Device Profile section select NanoTag - US915 and then Submit.
It'll ask you for your Application Key, that should be on the same piece of paper/csv your DevEUI was on. Paste that in, then hit Submit.
Whew, you've got this side of it done.
Now, BEFORE you tear the tag and activate your Nanotag, let's talk about what we're going to set up. You've got a fork in the road here.
Wolfpack or Lone Wolf
Most of you reading this will have gotten a NanoTag from me under the general assumption that you'll activate it and contribute your SNR/RSSI/temp readings to a database that I maintain, which will in turn allow you to see roughly where your NanoTag is.
There's no actual obligation to do that; you can stick the tracker on a package and send it to your Aunt Mabel then have her slap it on Uncle John's car to see if he's really going to the barbershop every Thursday or if, ahem, some other game is afoot. That's probably illegal by the way, and I'm not telling you to do that; I'm just saying you don't HAVE to contribute to the MAPGRID_AI project.
If you're Lone Wolfing it you'll have to set up your own integration to store the data, build your own maps to see where the Nanotag goes, and generally walk your own path. Some of you love that, and that's fine.
For those of you who want to go a little further with me, here's what to know and set up next BEFORE you rip that tag.
Accurate & Precise Positioning Is Hard
I’ve been fascinated lately by the idea of doing the most with the least, and having a thing that transmits just three things (temp, RSSI, and SNR) and not GNSS location, not jostles or shocks via accelerometer, not occupancy, nothing, is a nice clean restriction.
Of course, you DO get what gateway the thing comes through along with the two key aspects of signal strength and clarity (RSSI and SNR), so you can get a rough idea of location.
By rough, I mean with 5 or 6 gateways you can get to within 5 or 6 kilometers or where the Nanotag is, however...
When Gateway Positions Are Unknown
There is one other twist: The gateways aren't always where they say they are.
Due to the nature of the crypto incentives in Helium, mostly during the initial buildout of the network when the incentives were insane, some gateway owners "assert" their gateways anywhere from a couple hundred meters to a few thousand kilometers away from where they are. The closer they are to their assertion point, the harder it is to detect if they really are where they say they are.
So, not only do we have not fine-tuned locations, our reported locations may be incorrect. I think it's kind of neat to be faced with this problem, and I'm curious how to solve it.
Why? Because it’s hard, it's fun, and as far as I can tell, solving it accurately is quite difficult and requires a certain set of conditions which just happen to exist in San Diego, where I live.
Each time a packet is fired from a NanoTag and received by up to 6 gateways, we create a fingerprint of wherever that Nanotag is.
Fingerprints
At first, those fingerprints are kind of boring; one packet from NT8020 received by 6 gateways might give you the following fingerprint:
Gateway 01: RSSI -98, SNR 14
Gateway 02: RSSI -110, SNR 9
Gateway 03: RSSI -85, SNR 16
Gateway 04: RSSI -120, SNR 4
Gateway 05: RSSI -105, SNR 11
Gateway 06: RSSI -92, SNR 13
Quick Radio Terms
RSSI is the Received Signal Strength Indicator, and can be thought of as Signal Strength. SNR is Signal-Noise-Ratio, and can be thought of as Signal Clarity.
RSSI ranges from -130 dBm, which is very weak and near the sensititivy limit, to -30 dBm, which is very strong and close range. A "good" RSSI will be above -115 dBm, with optimal performance between -100 and -80 dBm.
SNR ranges from -20 dB (signals below the noise floor) to +10dB or higher, which is excellent clarity. A "good" SNR is generally above -7.5dB, and values below -13 dB signal poor quality.
RSSI and SNR are affected by obstacles and the RF (radio frequency) environment. It's not as easy as RSSI: -98 = 10.4 km. There could be walls in the way, or trees, or it could have bounced off a building.
A multi-packet purchase is a fingerprint that is anchored in time. This could indicate the following:
Gateway 03 (RSSI -85 dBm, SNR 16 dB): This shows the strongest signal, suggesting it's the closest or has the clearest line-of-sight path. In typical LoRaWAN deployments, this could indicate a distance of under 2 km in urban settings or up to 5 km in open rural areas, assuming no major obstructions.
Gateway 04 (RSSI -120 dBm, SNR 4 dB): The weakest reading, implying it's the farthest away OR most heavily obstructed (e.g., by buildings, trees, or hills). This is near the practical reception limit for LoRa, often corresponding to 10+ km in line-of-sight conditions or much less if blocked, marking it as marginal for reliable communication.
Gateways 01 (-98 dBm, 14 dB), 05 (-105 dBm, 11 dB), 06 (-92 dBm, 13 dB): These suggest intermediate distances, likely 2-8 km depending on the environment, with good to fair signal quality. The solid SNR values indicate minimal noise interference, but the varying RSSI points to some obstacles or elevation differences along the paths.
Gateway 02 (-110 dBm, 9 dB): Slightly weaker than the above group, this could mean 5-10 km or equivalent obstruction, with the SNR still positive but approaching levels where packet loss might increase in noisy conditions.
What Does A Fingerprint Look Like?
If we were to visualize this in a nodes-and-edges kind of way, it might look like this:

Now, that's just might. The gateways might all be along the same line; I just spread 'em out there to make it easy to visualize. They might be further or closer due to terrain or other obstructions. Unlike in solving a murder mystery, one fingerprint isn't enough.
As we start adding more gateways heard by two Nanotags isntead of one, we start to get something that looks more like this:
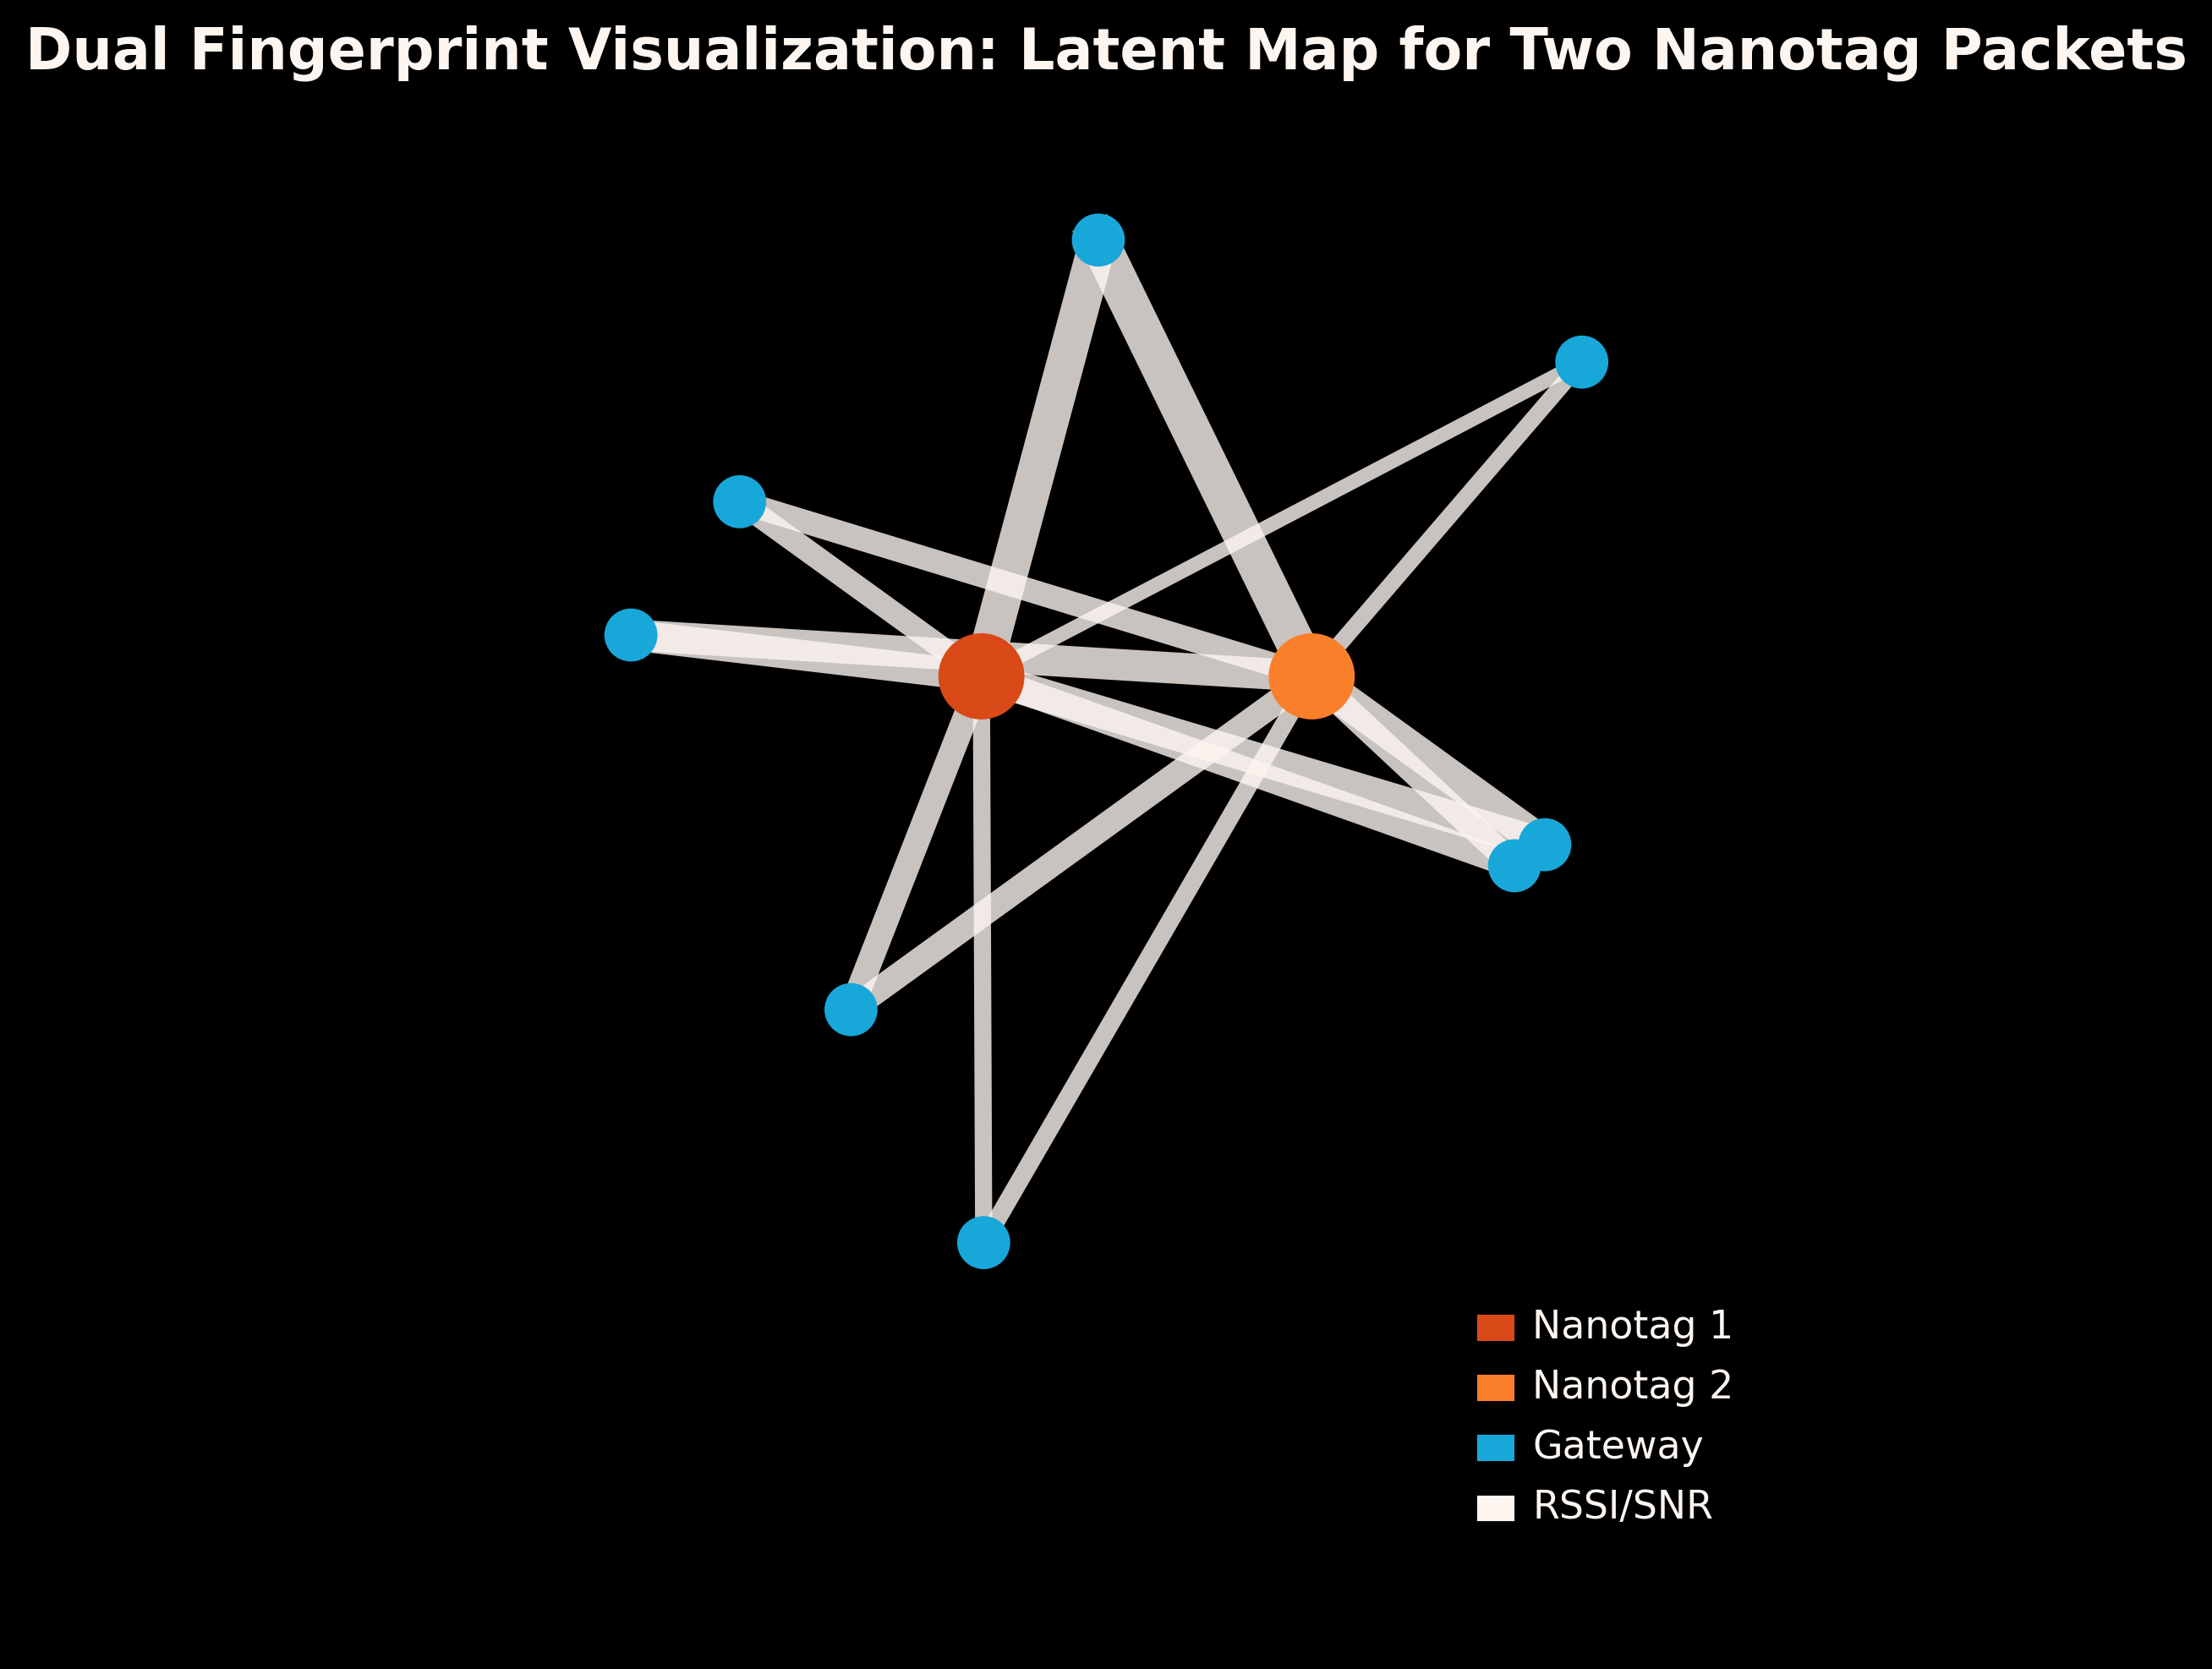
Obviously this is over simplified, and with so little information we have no way of knowing whether we're getting "correct" distances from the RSSI/SNR readings or if they're being distorted by passing through foliage, buildings, or just a few walls.
As more and more Nanotags travel around, sometimes covering the same location but often times different locations, we slowly get a clearer and clearer understanding of where everything is in relation to everything else. We still can't totally trust the gateways, but as more of you activate your Nanotags and more readings go into the database, we can build a better and better map together.
At first we just know that one point exists, then that 2 points exist in relation to each other, than 3, 4, 10, 100, 10,000.
At some point, your relational map starts to match up to a place in the real world; your latent map becomes a real one.
In order to get there, you need a way to sort through the mess. I did that by building a model, which is what drives the map display.
Start Your Engines!
Now that you have some background on how this work, the next part's easy. You've already added the NanoTag to your MetSci console, all you have to do is tear off the bottom tab.
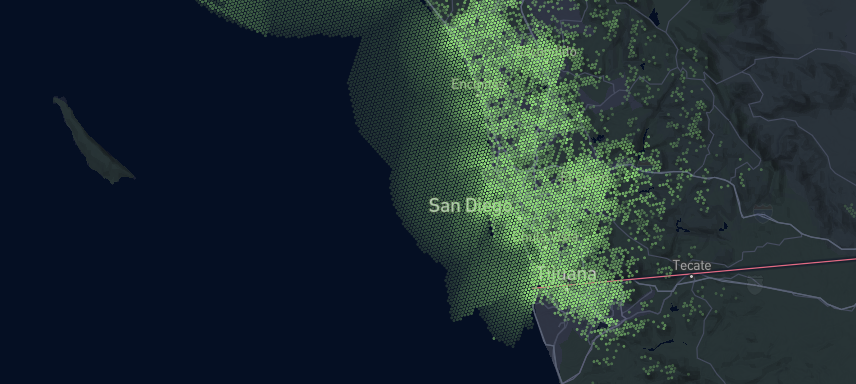
Watch over in Console to make sure it joins.
You'll need to be within Helium coverage, must urban and suburban places are, but you can double check over on the Helium World Explorer. As you can see, San Diego has excellent coverage.
Configure Your NanoTag
With your NanoTag joined to the network, let's get it firing at the frequency you want it to.
Do NOT proceed until you've seen your device join the network.
There's no way to plug a cable in to configure these NanoTags (other variants DO have that option for nerds). We have to do it wirelessly, via a Downlink, which will send a message via the Helium LoRaWAN.
You can't be chatty on a LoRaWAN; it's designed to send tiny packets of data really long distances. This means Downlinks are encoded into the minimum required bytes.
We'll use the MetSci NanoTag configurator tool to generate the downlink we want. Nanotags have basically 2 things you can configure: How often it records a temperature (the Record Period), and how often it transmits that data (the Report Period).
This particular tool also lets you configure your tag for seconds or minutes, so if you want to burn through data fast you could fire off ever 20 seconds. For this SPECIAL PROJECT, if you're moving a bunch aim to fire off frequently (like every 5 minutes), whereas if you're static, send a new downlink to just chill for a while.
MeteoScientific Nanotag Downlink Generator
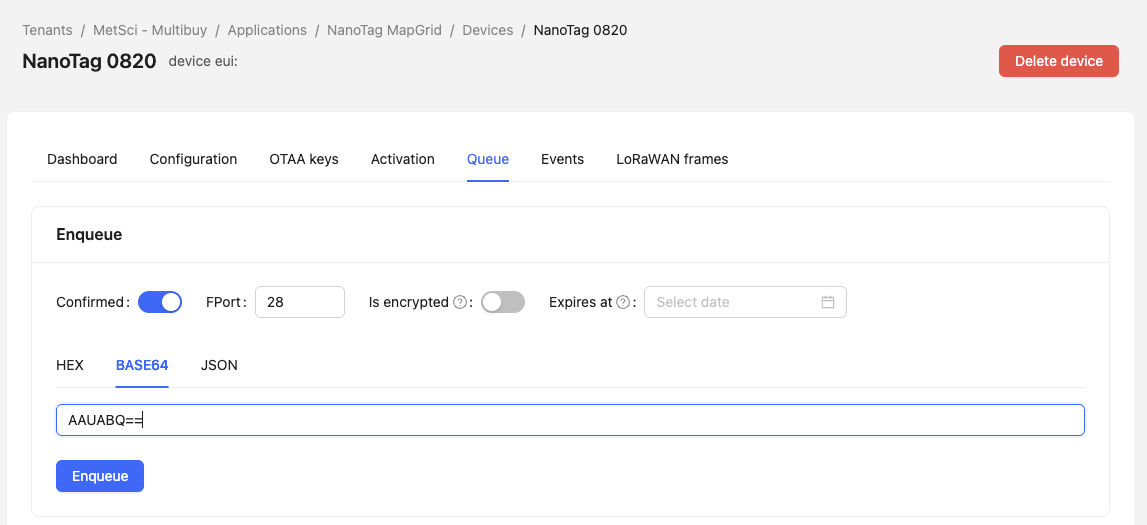
Queue The Downink
Select your device, then go to the queue, then send your downlink. You can queue a downlink in two ways: inside MetSci or programmatically.
We'll start with doing it within the MetSci Console.
In your device, go to the Queue tab, then select Confirmed, set the the Fport to 28 for minutes, then send the Base64 payload you chose forom the Configurator (above). To start, I'll use a Recording Period of 5 and a Reporting Period of 5, which gives me a Base64 payload of AAUABQ==.
Hit the Enqueue button and the next time your NanoTag uplinks, it'll be reset to fire every 5 minutes.
You can write a script that'll queue up a downlinks at certain intervals. You'll need to generate an API key from the MetSci console (look for API Keys in the menu on the left), then either do this as a curl or as part of a script, making sure you wrap your payload in queueItem.
curl -X POST https://console.meteoscientific.com/api/devices/YOUR-DEVEUI-HERE/queue \
  -H "Authorization: Bearer YOUR-API-TOKEN-HERE" \
  -H "Content-Type: application/json" \
  -d '{
    "queueItem": {
      "confirmed": true,
      "fPort": 28,
      "data": "AAUABQ==",
      "isEncrypted": false,
      "isPending": false,
      "fCntDown": 0,
      "expiresAt": null
    }
  }'
If you want to get fancy, have it sleep when you're sleeping (8 pm to 8 am or whatever) and fire faster when you're up and moving around.
Where Do You Send The Data?
From here, you'll want to send the data somewhere.
Lone Wolf
If you're a lone wolf, you'll have to set all of this up on your own, including the map, the database to store all the points, and where you're going to embed and display everything.
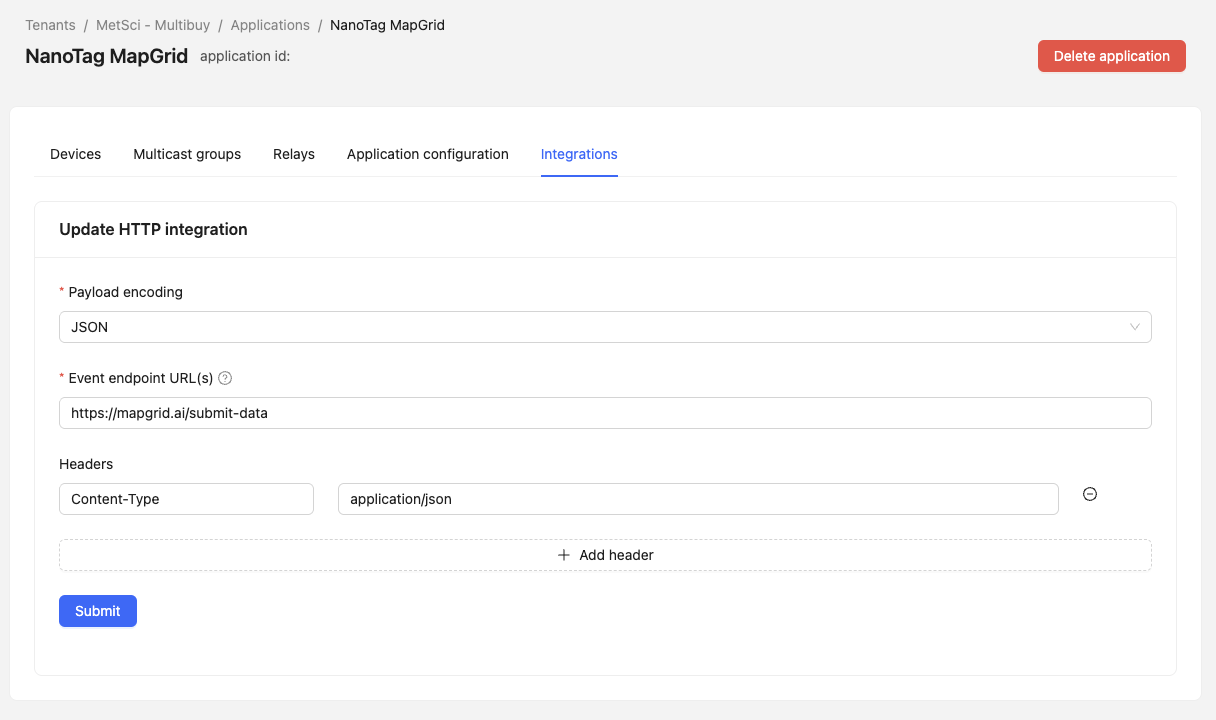
Running with the Wolfpack
If you're running with the wolfpack (i.e. contributing to the MAPGRID_AI project), in your MetSci Application set up an http integration to post to the MAPGRID database. This will ONLY work if you have a Nanotag that I gave you (or that you've given me the DevEUI of)
Set Payload encoding to JSON.
Set the event endpoint to https://mapgrid.ai/submit-data
Set the Headers to:
Key Content-Type and Value application/json
Then hit Submit.
Super Job!
You're now contributing to the MAPGRID_AI map, thank you and nice work!
As of Aug 2025, contributing to the map only improves the certainty of gateway location, it does NOT show you were your Nanotag is.
As more data comes in, the model will continually be refined and improved.