Let's Integrate
Ok, all of LoRaWAN is cool, but Integrations are one of the coolest parts.
Integrations are what allow you to get the data that you've collected on your device and routed to the Console to the real world to do work, whether that's flipping a switch, lighting up a dashboard, or tracking a sled.
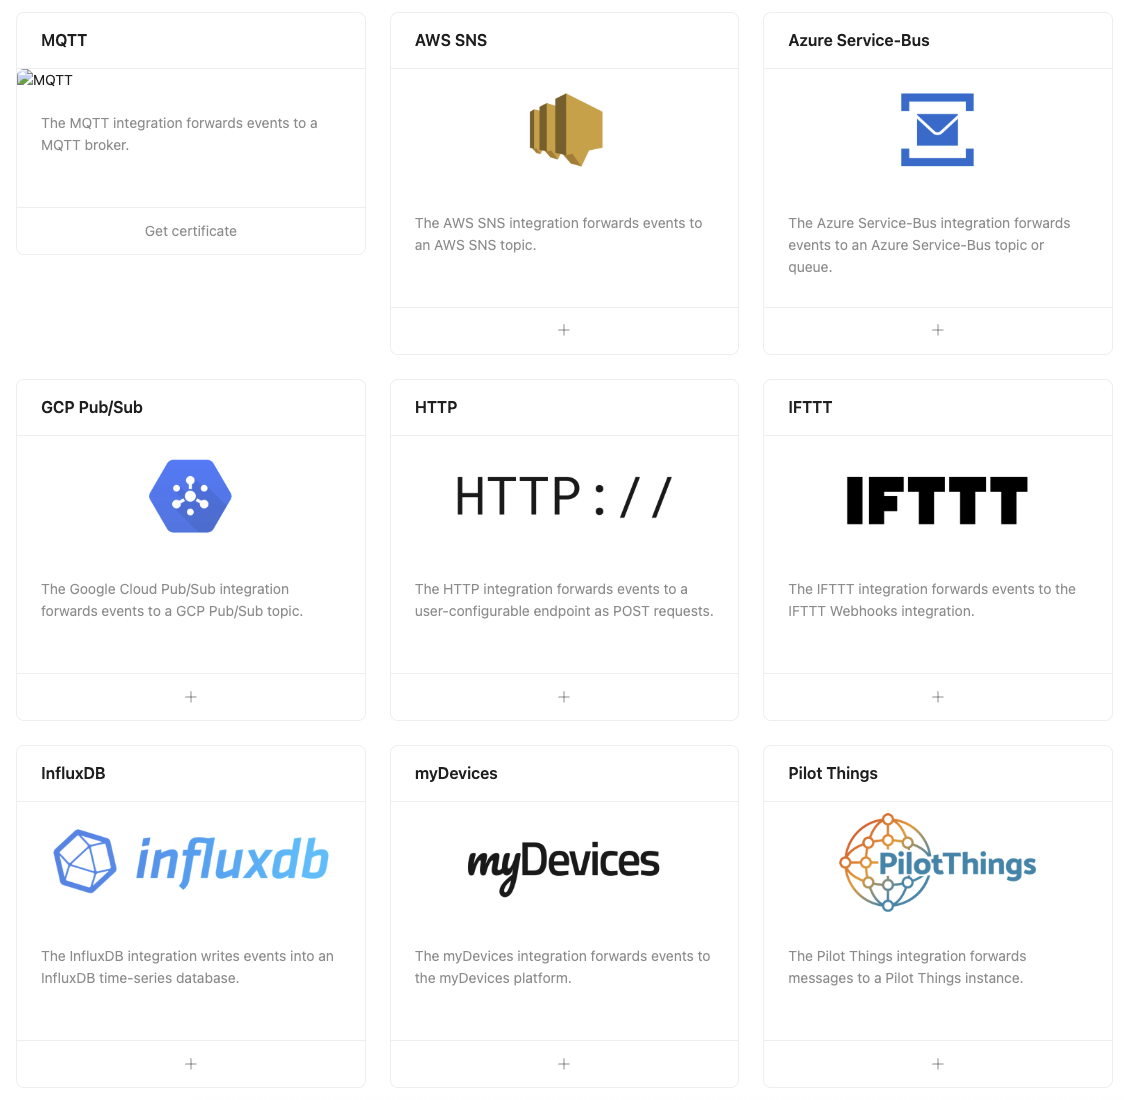
Natively, ChirpStack offers a bunch of different integrations:
MQTT Workaround
We'll start with the first and most confusing for many MetSci Console users, which is MQTT.
In a normal non-Helium ChirpStack instance, you can use MQTT without any issue. MQTT is how many "normal" LNS operators send data off their Console.
However, in a public Helium ChirpStack instance like MeteoScientific's, we have a problem. The Chirpstack native MQTT integration uses an internal MQTT broker, which would mean your broker is also my broker. That's not a safe way set things up.
As much as we trust each other to swap MQTT spit, I can't trust every asshole on the internet to not try any funny business on a public, permissionless Console. This means that for security reasons, we don't offer a native MQTT integration.
This means if you want to use MQTT on the MeteoScientific Console you'll need to use an http integration to forward to an MQTT broker YOU own and control.
Other Integrations
Other integrations exist in our Chirpstack; you can send your data to AWS SNS, Azure Service-Bus, GCP Pub/Sub, IFTT, InfluxDB, and more. They're all rad in their own way, but today we're going to focus on the most straighforward integration, one we've already mentioned: An http integration
HTTP Integrations On Chirpstack
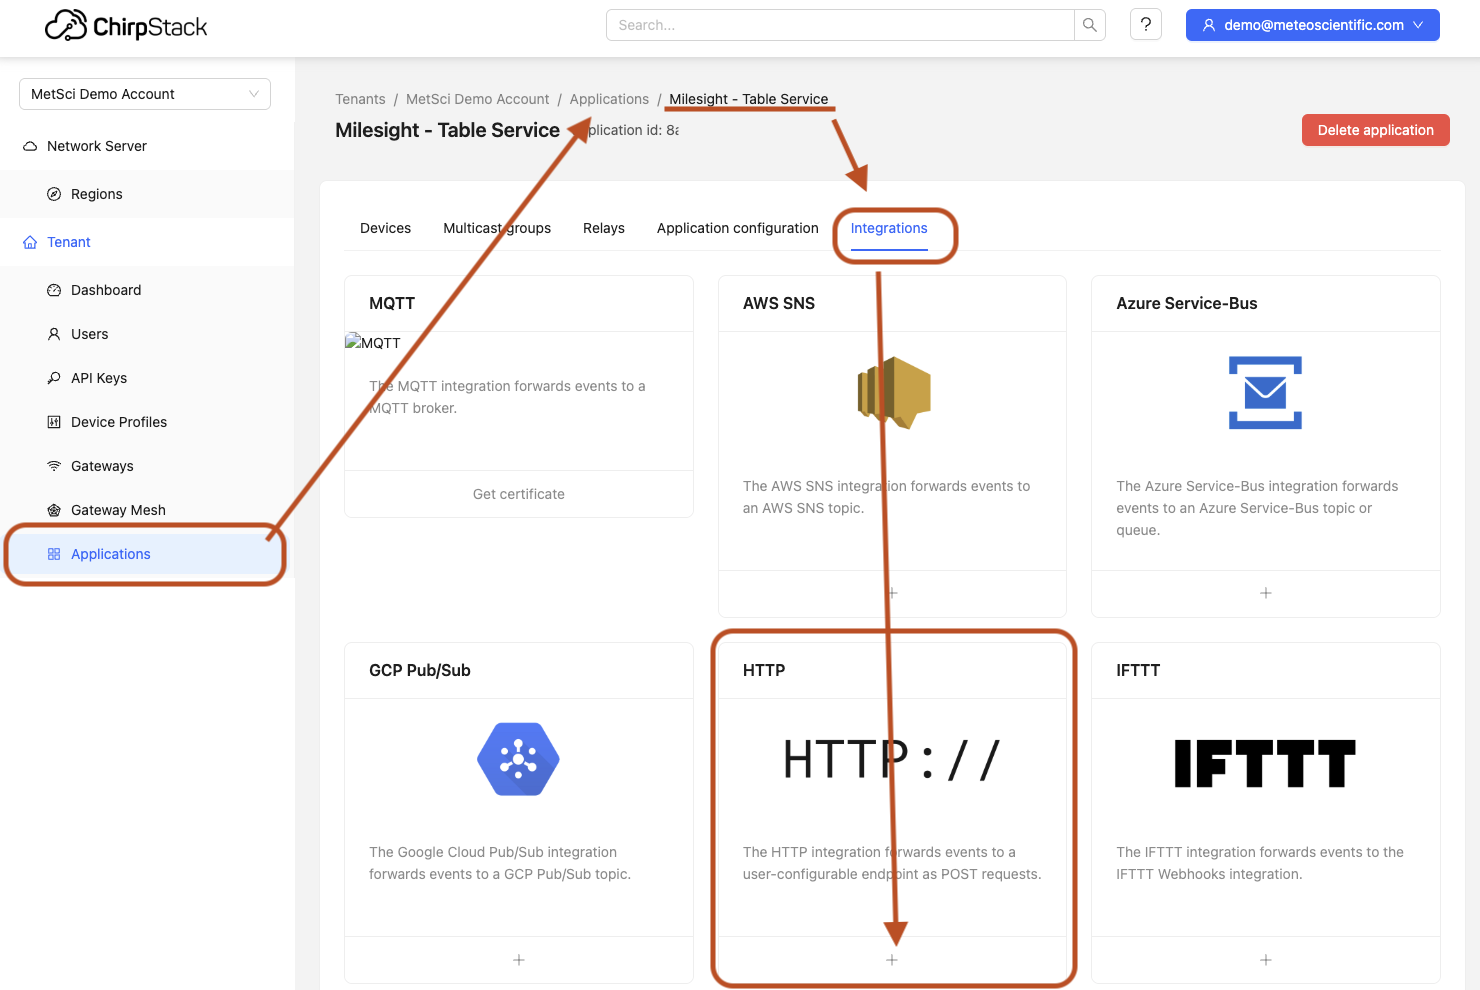
You'll find Integrations in any given Application. For this tutorial, I'm going to use the Milesight Table Service application, which is a way to use a Milesight WS101 button to call for a waiter at a restaurant.
Once I'm in Application --> Milesight Table Service --> Integrations I look for the big HTTP:// box:
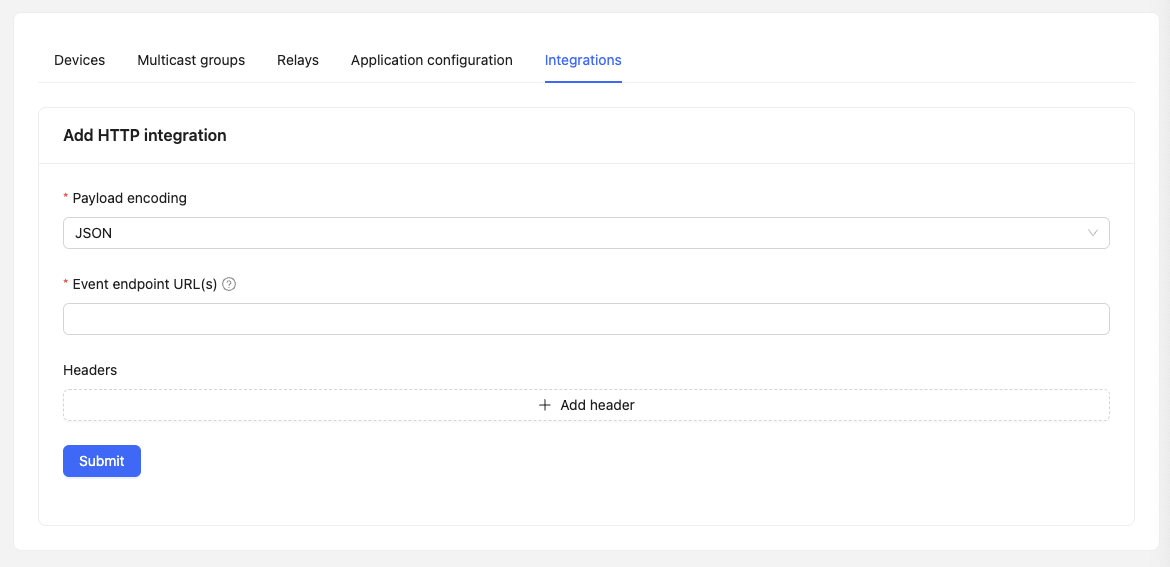
The Integration Fields
Hit the + sign and it'll bring up the window asking for your details, including
- how you're going to encode your payload (we're going to use JSON)
- where it should send it to
- if you want to add any headers.
You can use headers to customize payload formatting, support specific API requirements, or in our case, enable authentication tokens. Relax, I'll give you all of these just a little further down.
Now, you may (like I was) be so excited about LoRaWAN that you just fired up a device, got stoked to see it JOIN and get a few uplinks in the Concole, and then wonder, but but but...is it REALLY working?
I knew you'd be excited about it, so I built an endpoint for you to test your setup right now.
Setting Up The Integration
We're start by choosing the type of Payload encoding we're doing. I'm using JSON for the Milesight button.
Next, we'll fill in the endpoint. This is the place you want your data to go.
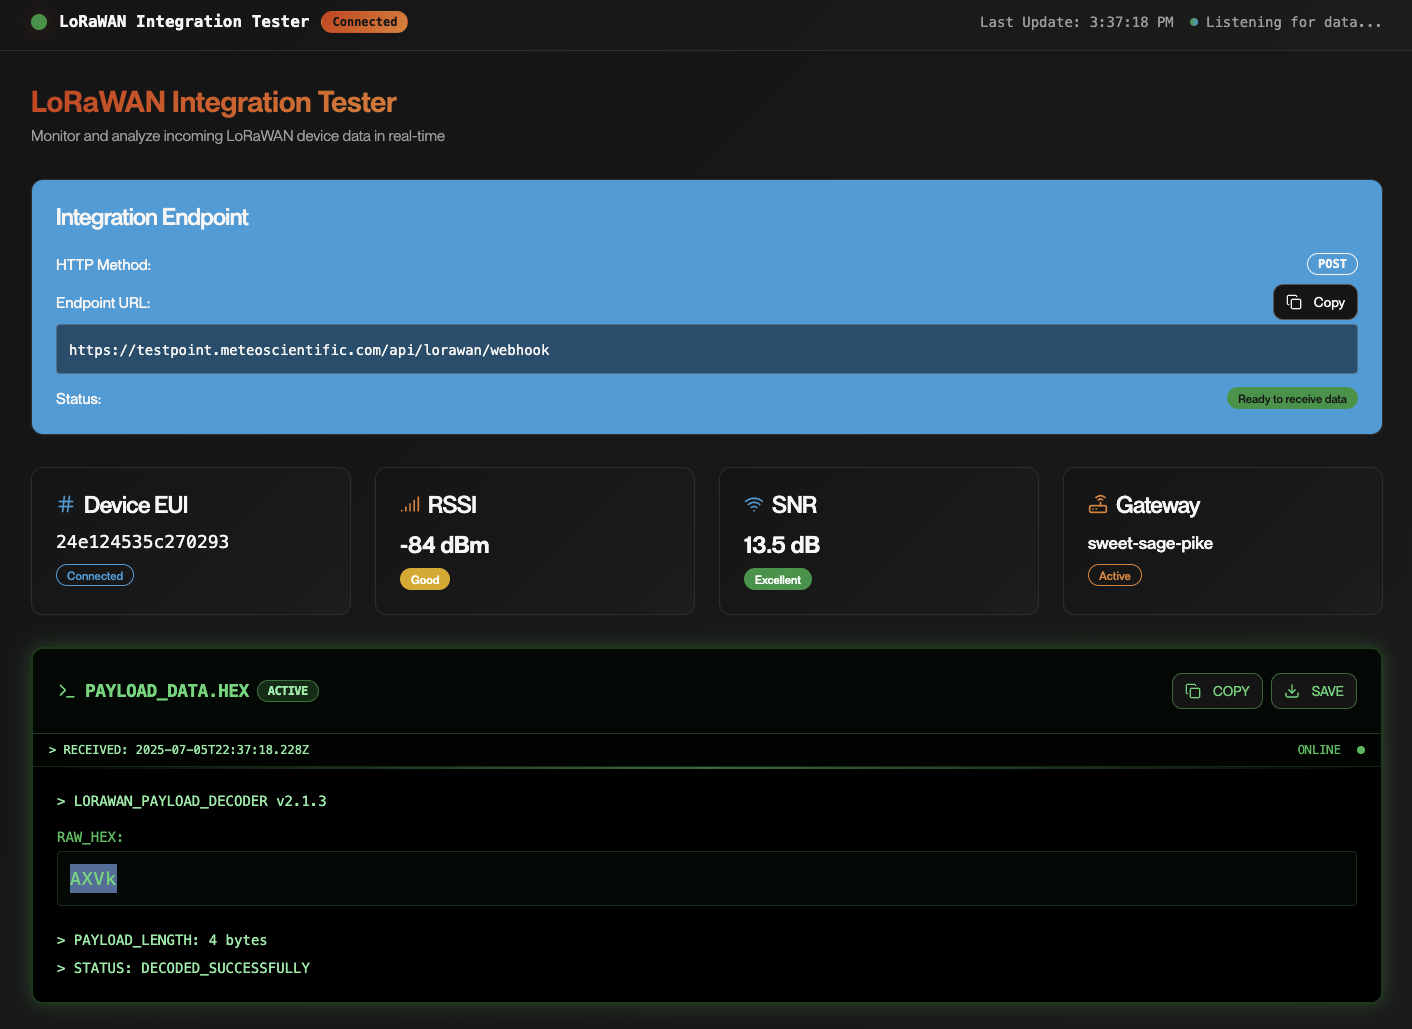
In this case, I've set up a public test endpoint for you over at testpoint.meteoscientific.com. You can use it for this tutorial or any time you want to just double check everything is working.
Head over there and copy the endpoint URL, then paste it into your integration. Then click the + Add header button and add two headers:
Key:AuthorizationValue:Bearer ACCzkUp4wSEbcI4ZApEBmVf2y4csa7EGoYkugLOyug
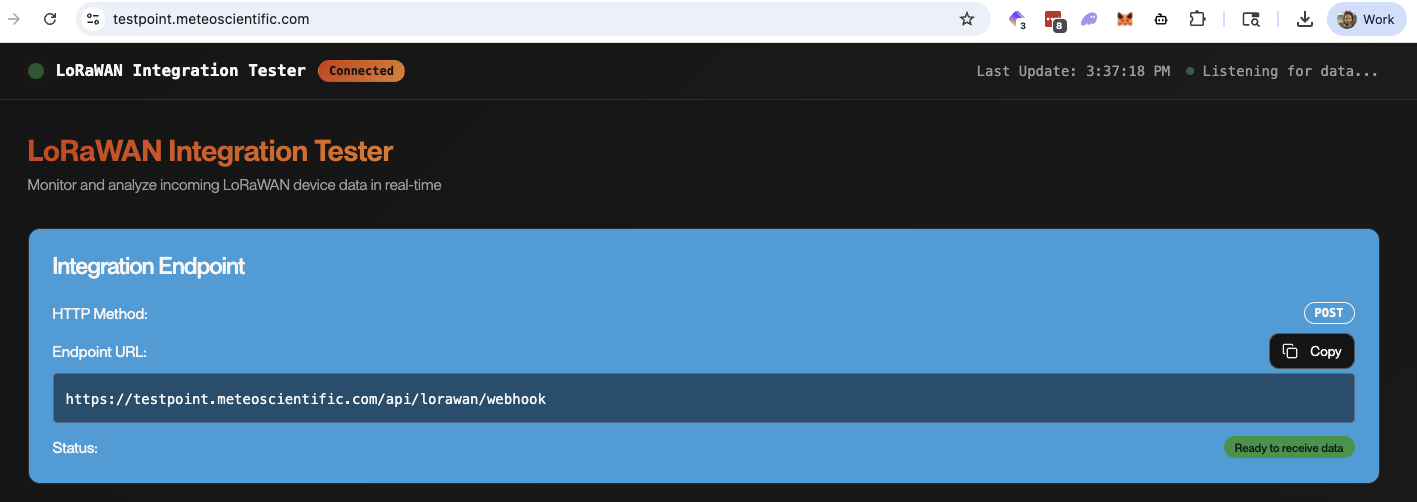
Anything you send to the PUBLIC test endpoint is PUBLIC. Your DEVEUI will display (just like it's on the outside of the device box when you get it) as well as the gateway that's receiving your data and a few radio quality signals.
This is what it will look like.
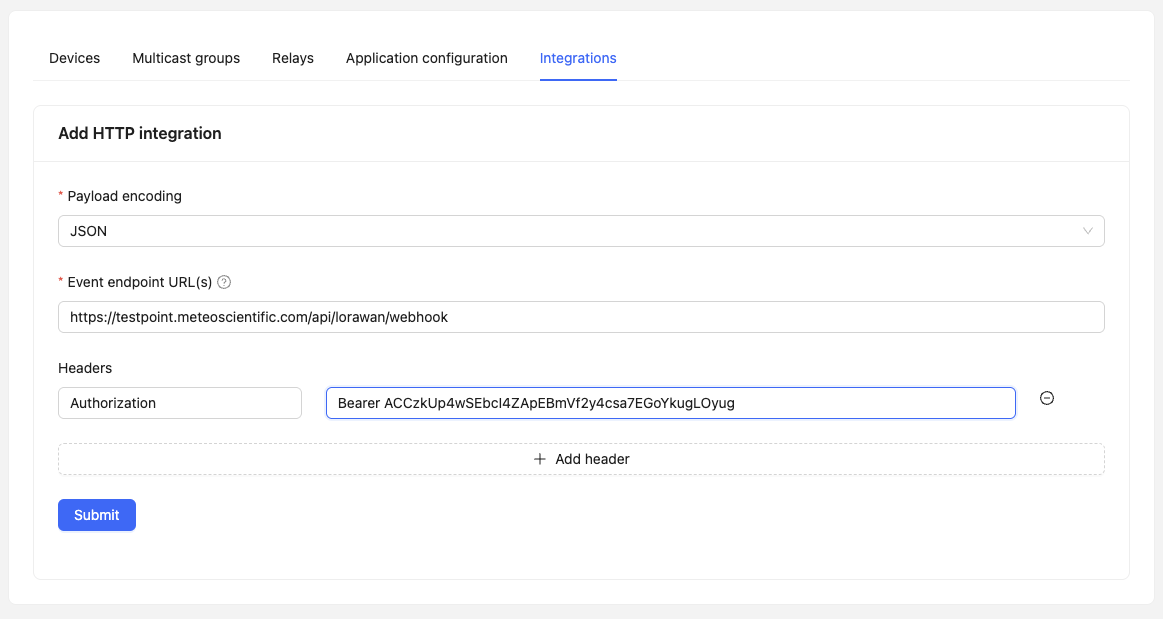
Using "Bearer" in front of the token is a best practice following the OAuth 2.0 standard specificing the authentication method in the Authorization header.
Using an Authorization and Bearer key makes it so that only you can send to an integration because only you have the auth token.
In this case, ANYONE who reads this tutorial and uses the testpoint.meteoscientific.com can use it, but that's not common practice.
Once you've hit Submit on the Integration panel, go ahead and fire off your device. In my case, I'll just press the button. This will send an uplink from the button to a gateway on Helium. From there it will go to the Helium Packet Router, which will send it to the MeteoScientific Console.
From the Console it'll go to the Application and find the Integration, and then it'll send that packet off to the integration.
In a normal boring world, you'd just get something boring, like AXVk. Big whoop.
At the testpoint site, we make it a little more awesome, displaying the Device EUI (so you know it's yours), the RSSI (should be between -120 and -80), the SNR (should be between -20 dB and +10 dB), and the gateway that processed your packet.
Yeah yeah, we'll also show you the payload. Sheesh.
That's it, your integration is working, woohoo!
Because this is just a test endpoint, your data doesn't stay there forever. The database resets every 10 packets, so your data will disappear when 9 other people after you have fired off their own test packets.
You can see how close you are to falling off the Database Cycle down at the bottom, along with the total requests that have been made (usually 2 per packet sent.)
You've Been Integrated!
That's it, you've completed an Integration. Now go set up your own, or keep advancing through the tutorials and try a few more; there are tutorials for how to set up Google Sheets to receive your data along with how to set up your own dashboard, and I've written blog posts on tracking assets that rely on integrations.
Welcome to Intregration-land.
Rock 'n roll!
