How Do You Keep Your Data?

If you're a business owner and psyched on LoRaWAN (or even just curious about it), one of the things you'll have to wrap your head around is how to store your data.
LoRaWAN devices are generally exceptional at sending data from one place to another, but if you want your data to be useful you have to both retain it and be able to integrate it into what you want.
Now, the economics of LoRaWAN can send you a bunch of different directions here. You could use a fully managed service to just set up all your devices, gateways, and data pipeline for you, but there are two problems with that approach:
A) Less fun - Why let someone else learn all this rad stuff?
B) More expensive - You'll pay someone else to have all your fun. That's silly.
Obviously this depends on your definition of "fun" and "expensive", but I'll assume for now that you're a business owner who is a little geeky and curious, intrigued by the idea of free data storage on a world-class platform, and you have an idea about how you'd use data from an IoT sensor to give you longer term insights into your business .
If that's not you and you just want someone to handle all this for you, reach out to me via the Contact page and I'll put you in touch with someone who'll do the heavy lifting.
Ok, with all the caveats out of the way, let's briefly sketch out the data flow to give you the big concepts, then we'll go through a step by step tutorial for how to get a sensor to send data that you can keep.
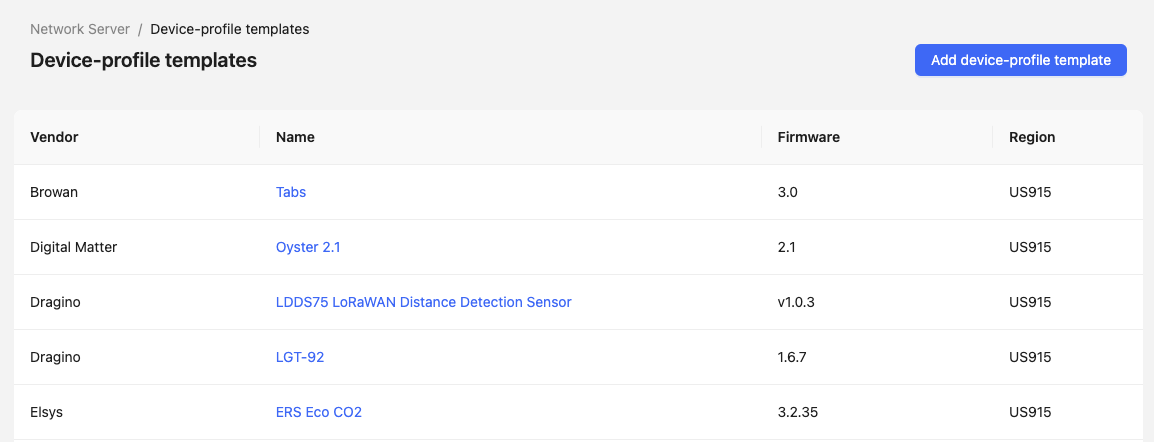
It starts with the sensor sending data. In this case we'll use an Oyster 2.1 asset tracker from Digital Matter. Onboarding these to any LNS is straightforward (hell, there's even a Digital Matter Oyster 2.1 Device Template set up for all users of the MeteoScientific Console that you can use for free)
With the data coming in to the LNS from the device, you’ve got a VERY temporary storage set up, but it’s only useful for testing.
I usually set up the Device Metrics in MeteoScientific just because I’m a nerd and it’s fun to do a quick check on what’s come in, but it’s NOT (by a long shot) a data storage mechanism that’s useful.
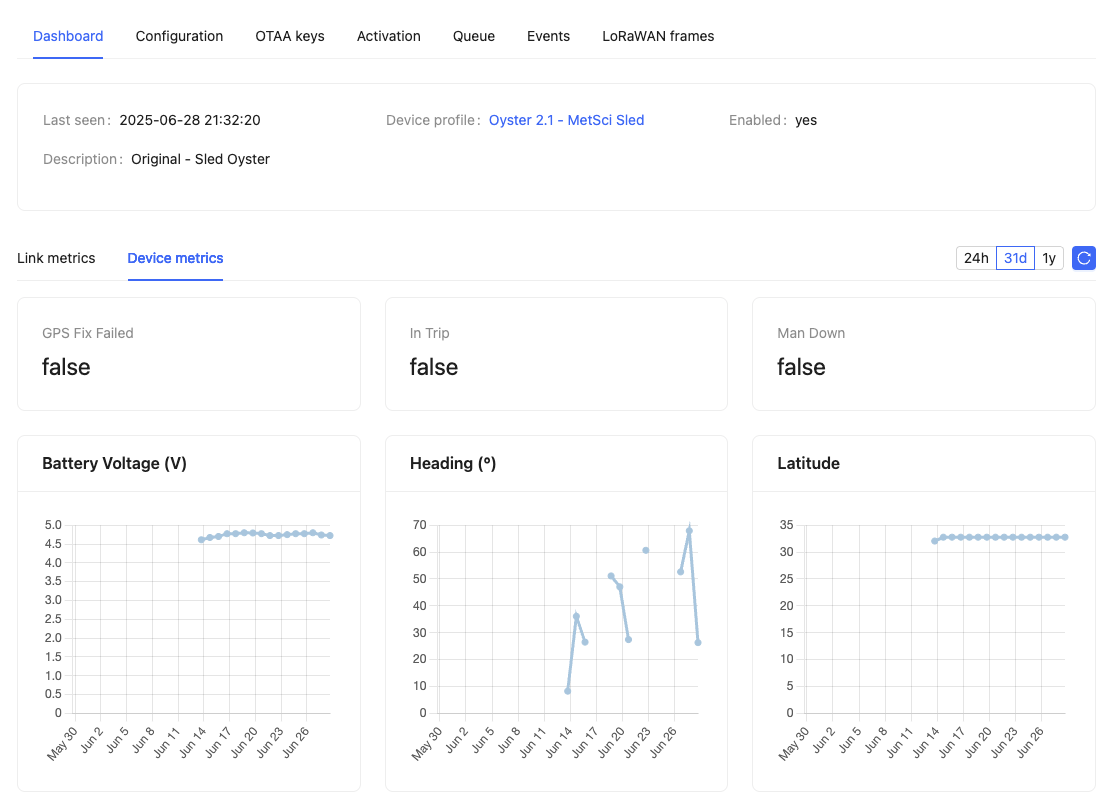
As you can see above, the tracker I’ve set up for this demo has been moving occasionally, and when it does it transmits the data it’s supposed to transmit (battery voltage, heading, latitude, etc.).
So, where do we send the data? You’ve got a TON of options here. For a few devices or very low volume most of them are free, with restrictions ranging from the number of devices you can have to the length of time you can store the data.
Services like Datacake or TagoIO offer free data storage and visualization of data for low device counts (5 or less) and short term data storage (30 days).
What we’re going to do today is slightly more geeky but gives you way more data for far longer.
It IS less easy, make no mistake. However, once you learn this you can use it for the rest of your business life, so there's that.
We’re going to send our data to a database on Cloudflare called a D1, and we’re going to do that with a Cloudflare Worker.
I get it, this might sound super scary and technical.

It’s actually not that scary.
Think of a database like a muscular Excel sheet and you’ve got a good picture of what you’re doing. The Worker is just the thing that takes your data from the LNS and puts it into the database.
If you can visualize rows and columns, you’re visualizing a database. Yes, it can get way more complex, but we're not running an Amazon warehouse here, we're storing the data of a couple dozen things, starting with just one thing.
The massive advantage of a Cloudflare D1 for what we’re doing is that the free level is more than enough for most small business needs. You can have up to 10 databases with each one having 500 MB of data.
As a rough stand-in for how much 500 MB will get you, it’s about 4 million rows if you’re tracking 10 “short” things (id, name, latitude, longitude, speed, heading, battery voltage, rssi, and snr.)
For a tracker sending every 5 minutes you can store 7+ years of data.(4,000,000 / 1440 minutes per day / 365 days in a year).
You get 10 of those databases on the free plan, and the first paid tier after that is $5/month.
The “hidden” cost is the geekery of setting it up, but I’ll walk you through that now.
I’ll make three assumptions here.
First, I’ll assume you have a Cloudflare account.
Second, I’ll assume you have a domain that you manage via Cloudflare. If you don't, it’s about $11 a year to buy a domain on Cloudflare which you can then use for this project. If you don’t want to go through the trouble of taking your current domain and futzing around with getting it onto Cloudflare, just buy a new domain and use that.
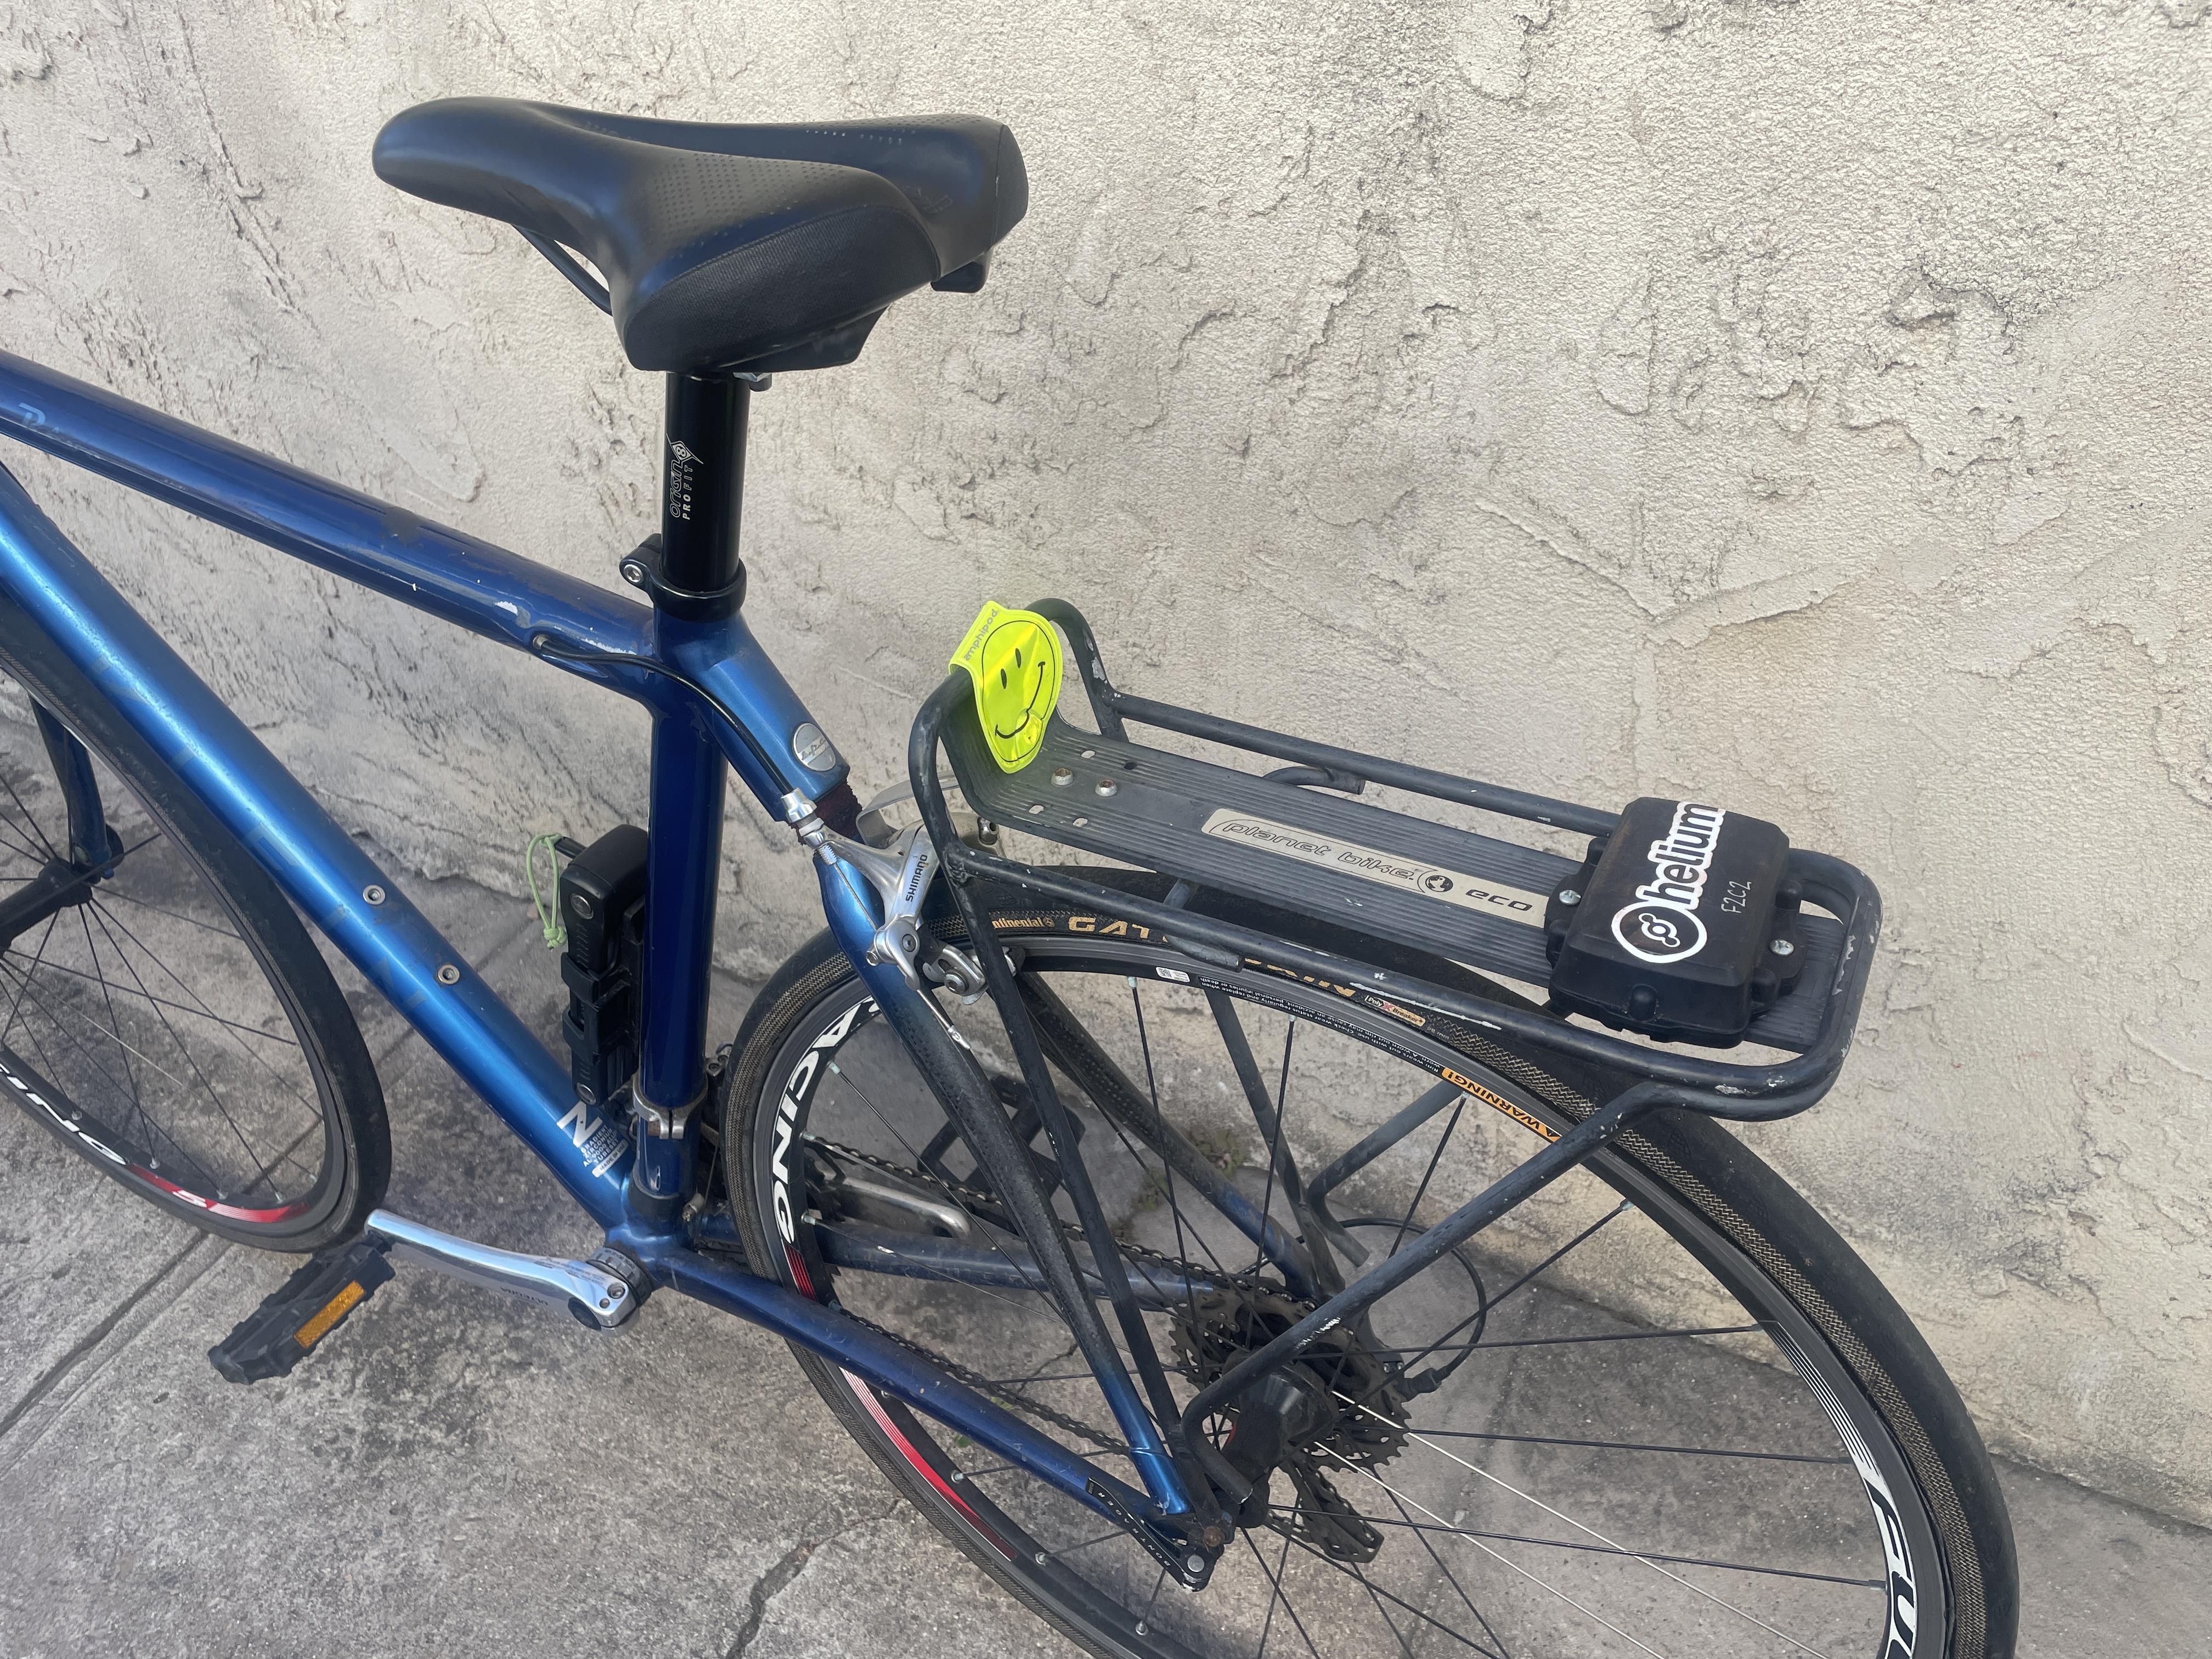
Third, I’ll assume you have a LoRaWAN device sending out data you want to track. In my case, it’ll be an Oyster 2.1 tracker that I’ve got mounted on my bike.
I can use this to store all the places that my bike goes and call in airstrikes if it gets stolen. If I wanted to get nerdy, I could use the data to build a heat map of local LoRaWAN coverage, but that’ll be for another tutorial.
Set Up The Database
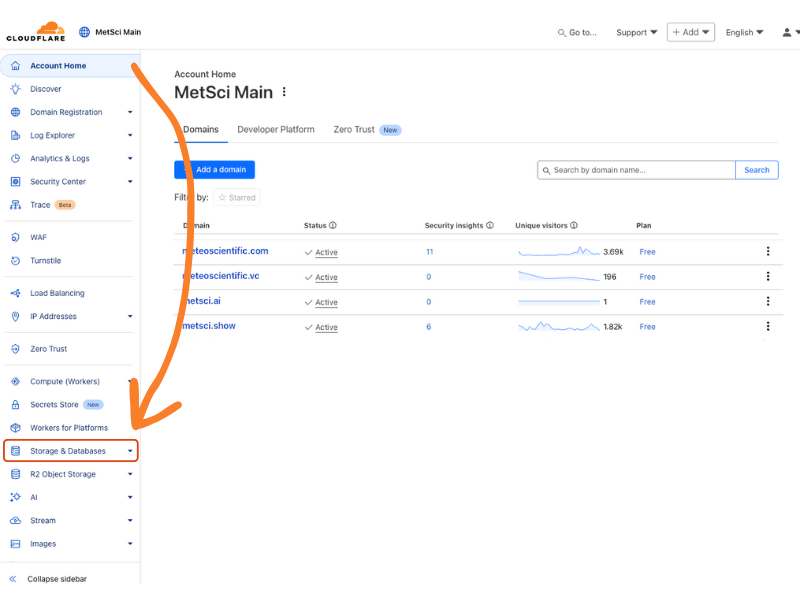
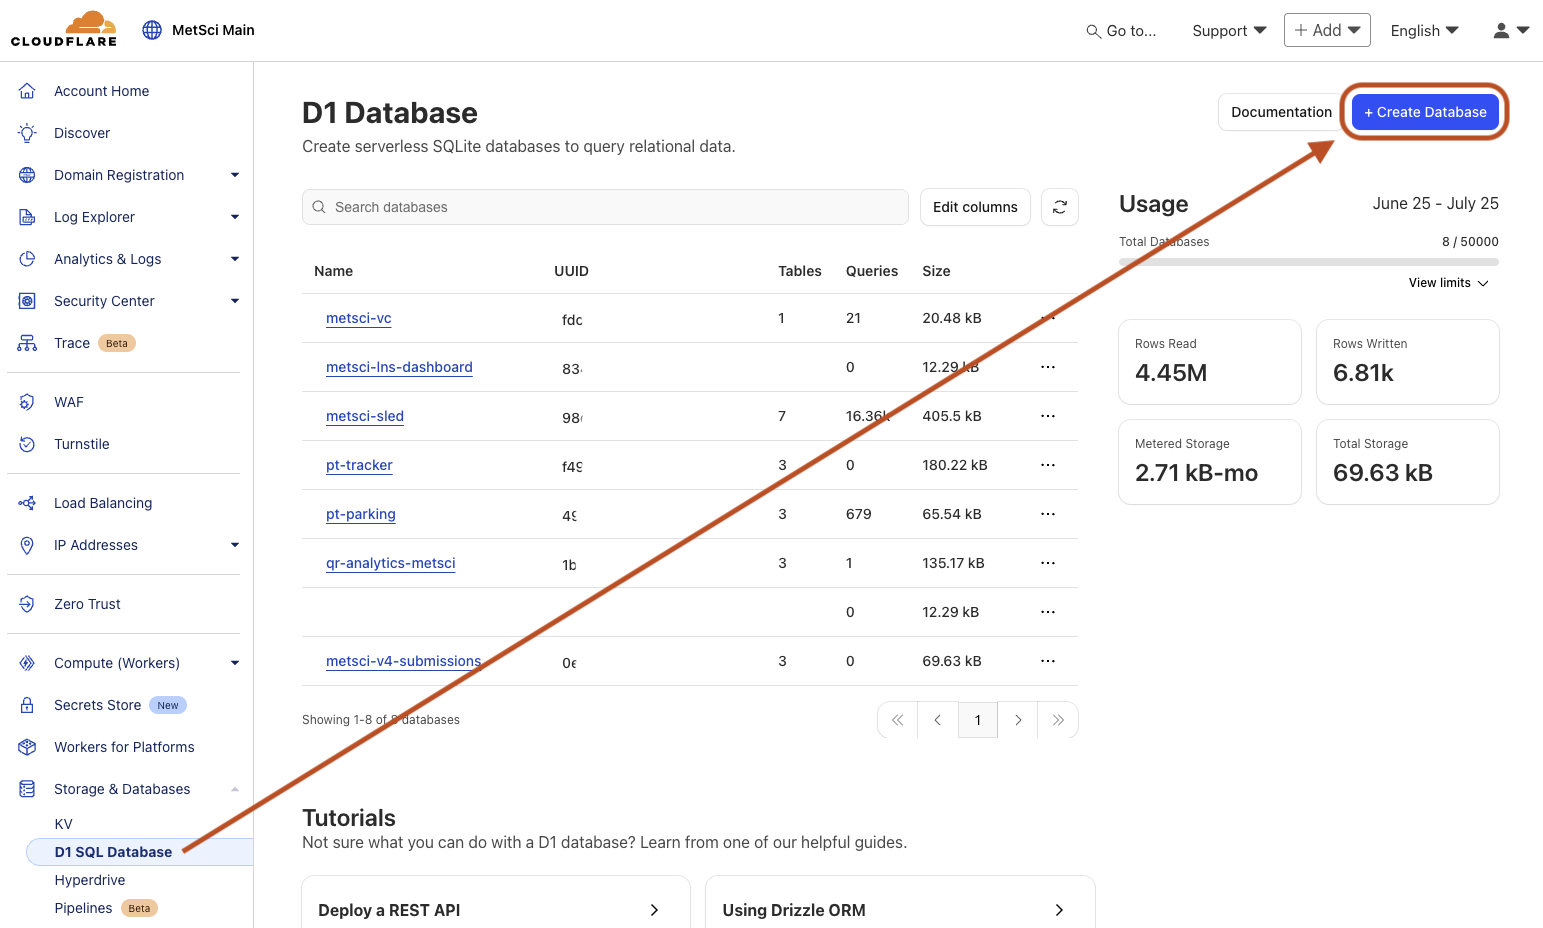
Let's do this! Sign in to Cloudflare. Once you’re on the Cloudflare Account home, select Storage & Databases, then D1 SQL Database from the dropdown.
Now you’ll hit the big blue + Create Database button at the top right and then follow the prompts.
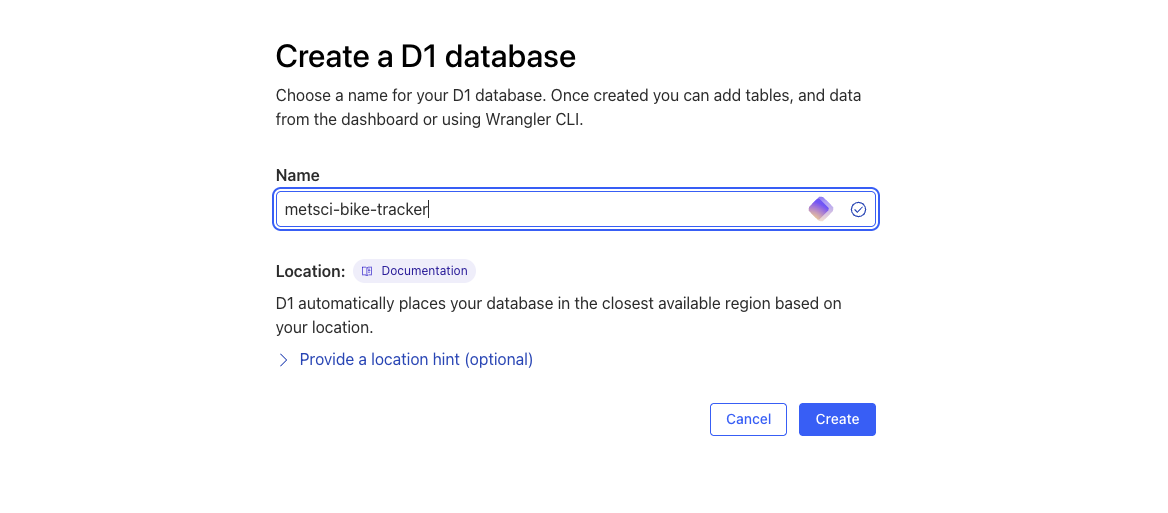
Name it (I’ll call mine metsci-bike-tracker), and leave the location as automatic.
Create A Table
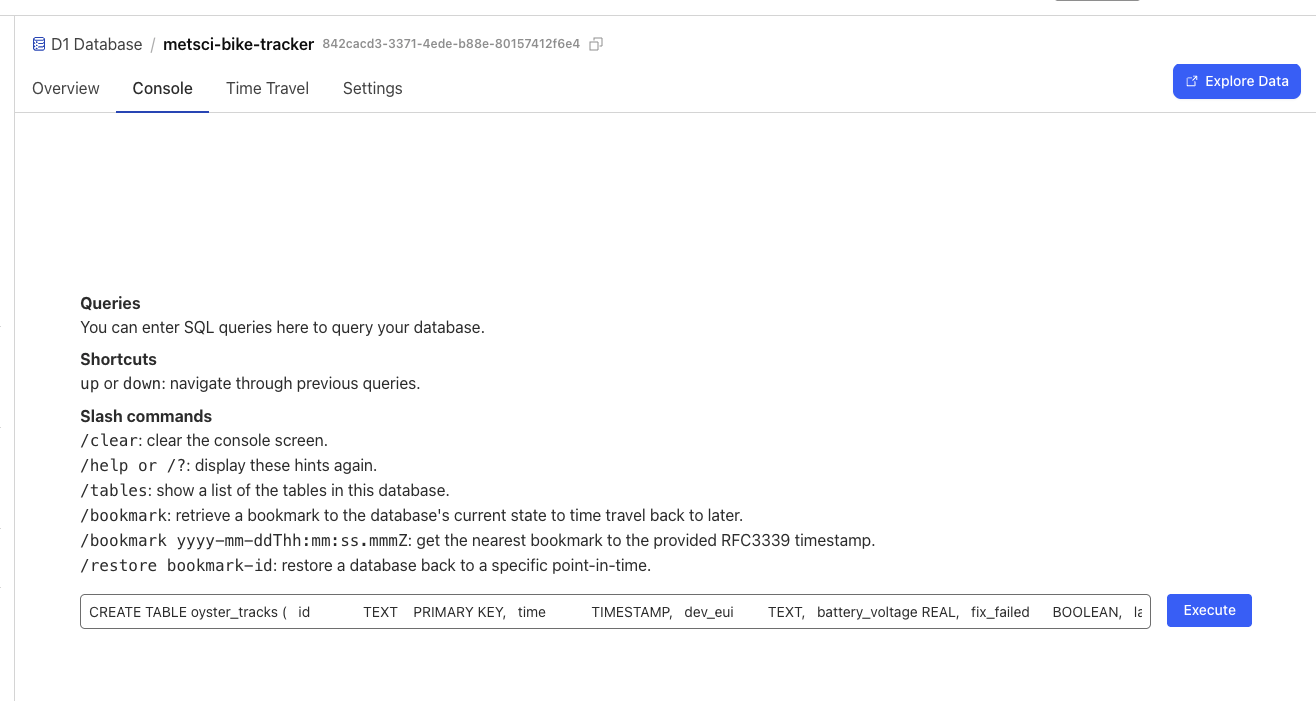
Next we’ll create a table. Click the blue “Create table” button at the top right, then select the Console tab in your new database and paste in the following command. To copy, hit the little copy button in the top right of the field, otherwise you'll only get the first few words.
CREATE TABLE oyster_tracks ( id TEXT PRIMARY KEY, time TIMESTAMP, dev_eui TEXT, battery_voltage REAL, fix_failed BOOLEAN, latitude REAL, longitude REAL, speed_kmph REAL, heading_deg REAL, rssi INTEGER, snr REAL );
If you’re not using an Oyster, modify your table to save whatever you’d like from your device. The absolute easiest way to get a custom table-create command is to use ChatGPT, telling it what you want and giving it a recent event log from your device.
The prompt for this would be something like:
Using the event log from my device,
please build me a "CREATE TABLE" SQL command
for a Cloudflare D1 table that stores the
following values: id, time, dev_eui,
battery_voltage, latitude, longitude, rssi, snr.
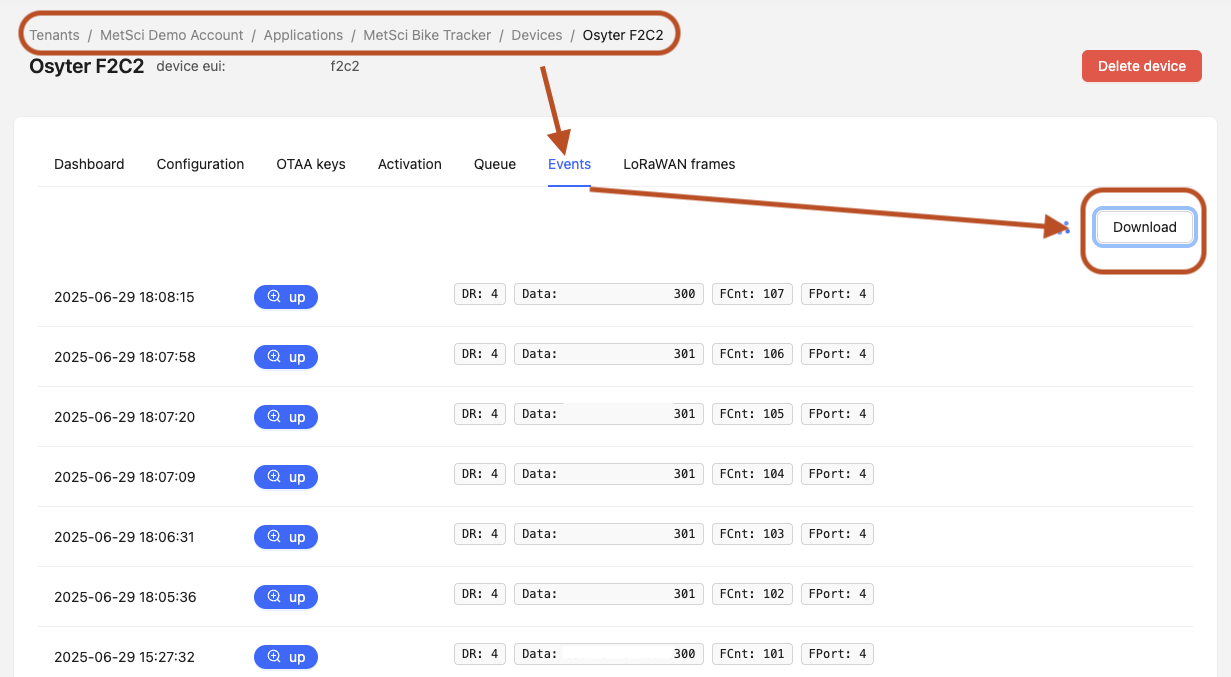
Each LNS can be a bit different, but to get your Event log in the MeteoScientific LNS, go into Applications —> your application —> Devices —> your device and select the Events tab, then Download.
Ok, now you’ve got your database and a table setup, we’ll need to create the connection between your LNS and the database. We’ll do this using an http integration to send from the LNS, and a Cloudflare Worker to receive the data and put it into the database.
Set Up The Worker
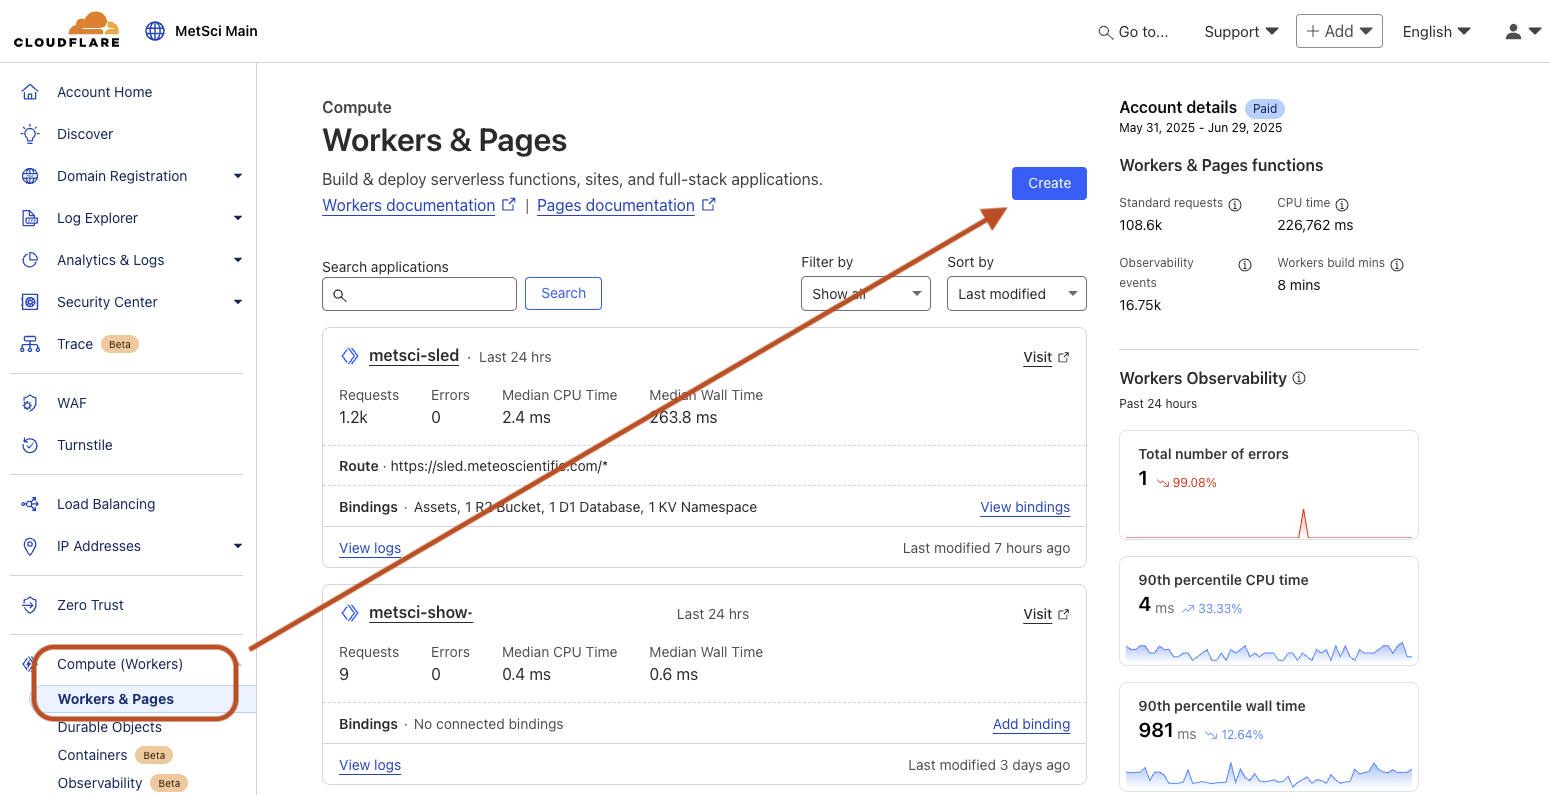
In Cloudflare, start by creating a Worker. Go to Compute (Workers) on the left column, choose Workers & Pages, then look for the Create button
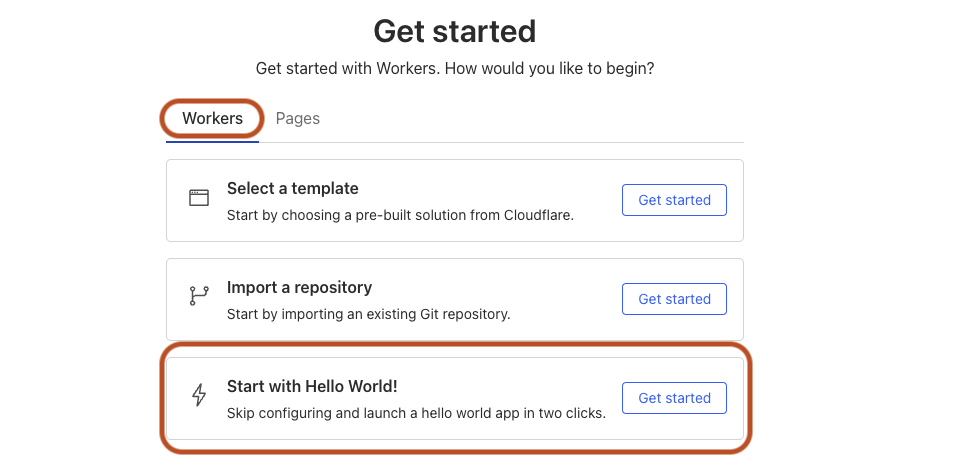
Choose Workers then Start with Hello World! option:
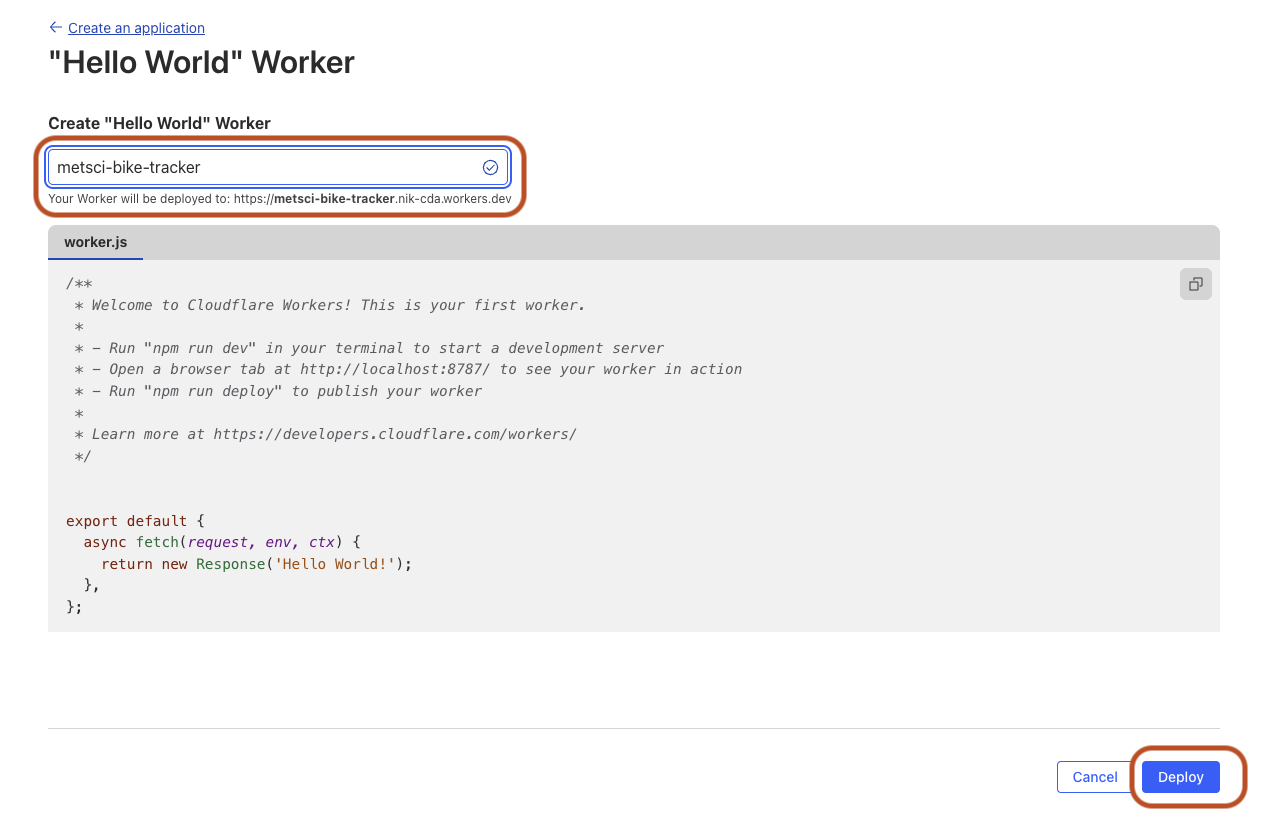
Name your worker (I’ll use the same name as my database, metsci-bike-tracker) and hit Deploy in the bottom right. You don’t need to change the worker.js code here, we'll do that later.
Domain & Routes
Now, as stated in the Assumptions, if you haven’t set up a domain with Cloudflare, this next part won’t work.
We’re going to set up three things here, a custom domain, a route, and a Cloudflare Secret.
Start with Add custom domain which will take you to the Settings tab in your fancy new Cloudflare Worker.
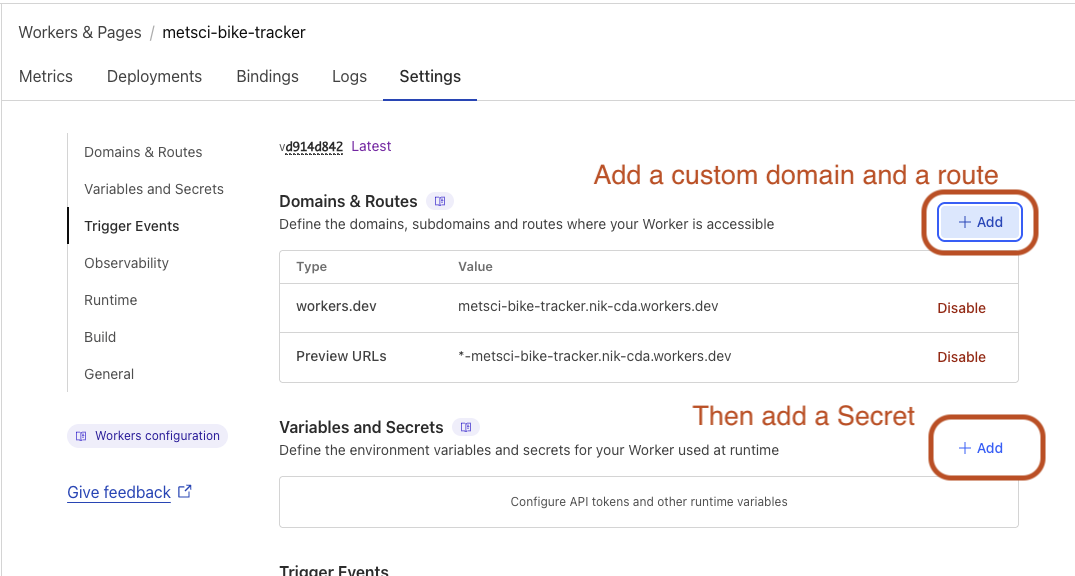
In Domains & Routes at the top of the page, select the + Add button, then choose Custom Domain and enter your custom domain.
In my case, because I manage meteoscientific.com through Cloudflare and this is a bike-tracker, I’m going to use bike-tracker.meteoscientific.com as my domain. You can use whatever you want. Hit Add domain at the bottom to save your selection.
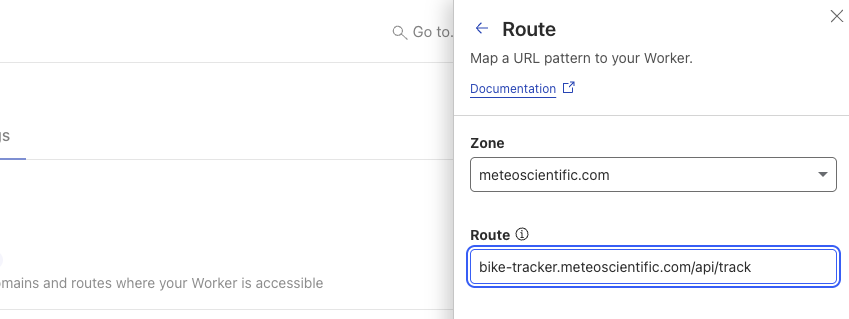
Next we’ll set up a Route. Use the same + Add button as before in the Domains & Routes section, except this time choose Route, then choose your Zone (your domain url) and paste in a Route. I’m going to use bike-tracker.meteoscientific.com/api/track
Set Up Your Secret
So now your Worker knows where to listen for incoming data, which is cool. We’re going to secure it so that not every jackwagon on the internet can just willy nilly add data to your table. We’ll do that using a Cloudflare Secret.
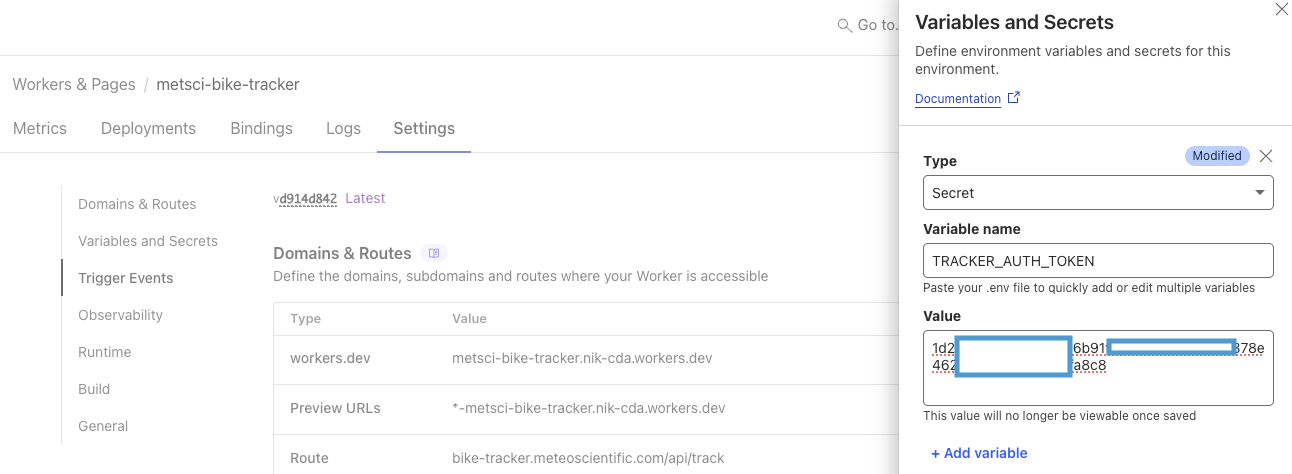
Hit the + Add in the Variables and Secrets section
Choose Type —> Secret then enter in your Variable Name (I used TRACKER_AUTH_TOKEN) and then a secret Value. Save this value and don’t share it with anyone. Use numbers and letters, no symbols, and make it long.
Add Worker Code
Now you’ll add the Worker code. I’ll give you mine for the Oyster, but if you’re using a different device, yours will be different. Again, the easiest way to get a working Worker is to use ChatGPT. Give it this as an example along with a full Event from your latest uplink and tell it what you want. For now, we’ll proceed with my example.
Choose the Edit Code button at the top right.
Then in the worker.js space, paste in the following:
export default {
  async fetch(request, env) {
    // 1. Only POST + auth
    if (request.method !== "POST") {
      return new Response("Method Not Allowed", { status: 405 });
    }
    const auth = request.headers.get("Authorization");
    if (auth !== `Bearer ${env.TRACKER_AUTH_TOKEN}`) {
      return new Response("Unauthorized", { status: 401 });
    }

    // 2. Parse JSON
    if (!request.headers.get("Content-Type")?.includes("application/json")) {
      return new Response("Unsupported Media Type", { status: 415 });
    }
    let body;
    try {
      body = await request.json();
    } catch {
      return new Response("Bad JSON", { status: 400 });
    }

    // 3. Extract fields
    const id           = body.deduplicationId;
    const time         = body.time;
    const dev_eui      = body.deviceInfo?.devEui;
    const batV         = body.object?.batV           ?? null;
    const fixFailed    = body.object?.fixFailed       ?? false;
    const latitude     = body.object?.latitudeDeg     ?? null;
    const longitude    = body.object?.longitudeDeg    ?? null;
    const speedKmph    = body.object?.speedKmph       ?? null;
    const headingDeg   = body.object?.headingDeg      ?? null;

    // 4. Take the reported RSSI/SNR (first rxInfo entry)
    const firstRx      = Array.isArray(body.rxInfo) ? body.rxInfo[0] : null;
    const rssi         = firstRx?.rssi  ?? null;
    const snr          = firstRx?.snr   ?? null;

    // 5. Insert into oyster_tracks
    try {
      await env.DB.prepare(`
        INSERT INTO oyster_tracks (
          id, time, dev_eui,
          battery_voltage, fix_failed,
          latitude, longitude,
          speed_kmph, heading_deg,
          rssi, snr
        ) VALUES (?, ?, ?, ?, ?, ?, ?, ?, ?, ?, ?)
      `)
      .bind(
        id, time, dev_eui,
        batV, fixFailed,
        latitude, longitude,
        speedKmph, headingDeg,
        rssi, snr
      )
      .run();

      return new Response("OK", { status: 200 });
    } catch (err) {
      return new Response(`DB error: ${err.message}`, { status: 500 });
    }
  }
}
It'll look like this:
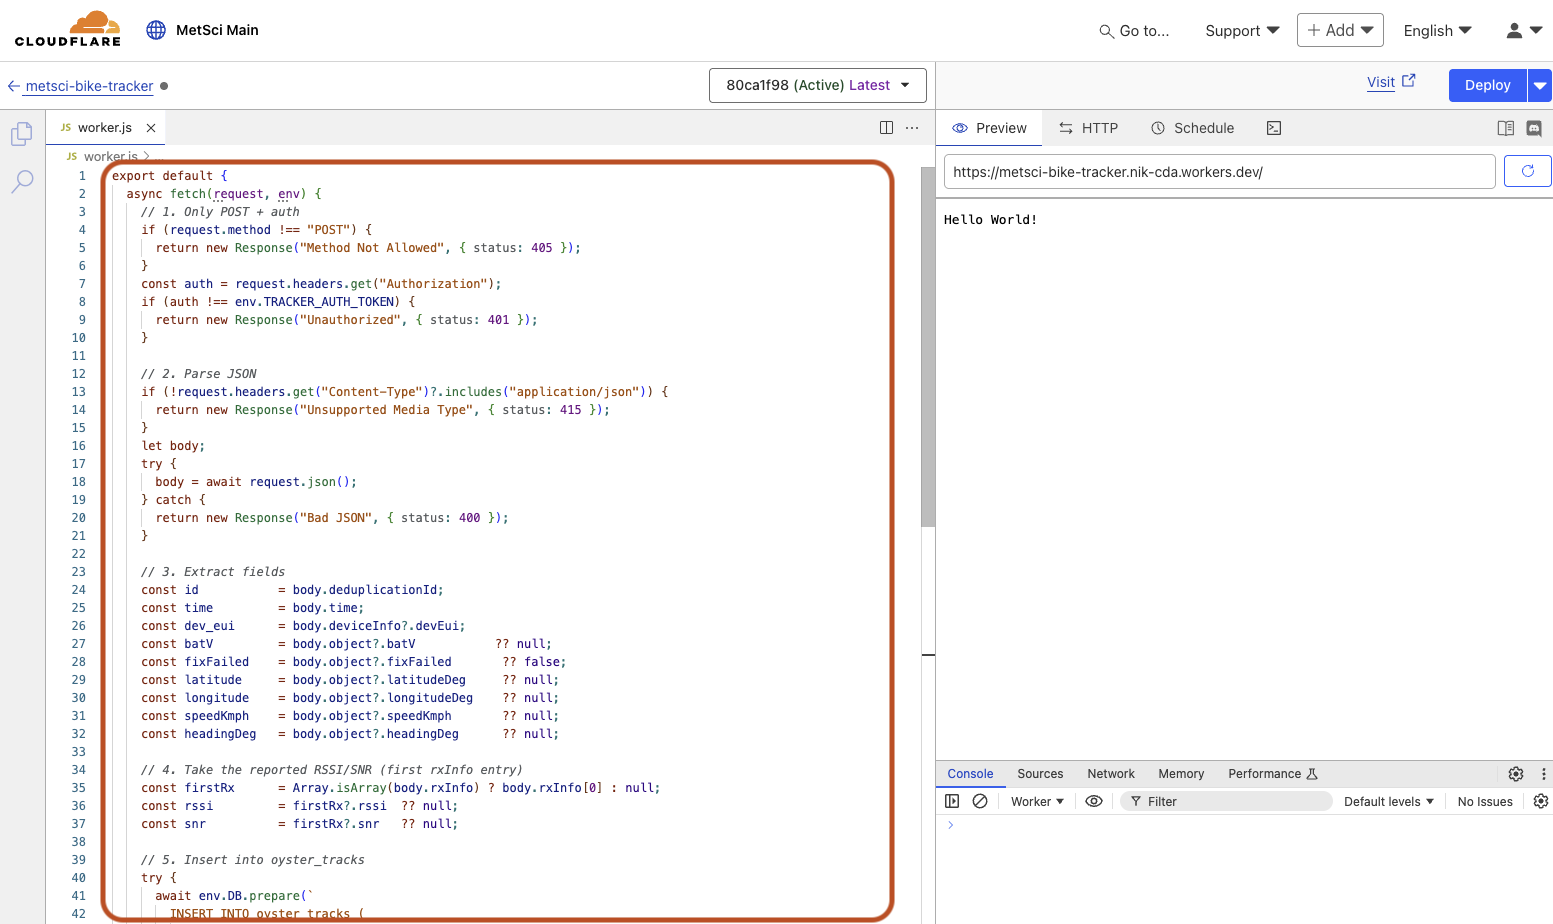
Then hit the blue Deploy at the top right.
One last thing and we’ll be done on the Cloudflare side. In the top left, click the left arrow metsci-bike-tracker or whatever you named your Worker.
This will take you back to your Worker and the main menu. Select the Bindings tab, then the blue Add binding button.
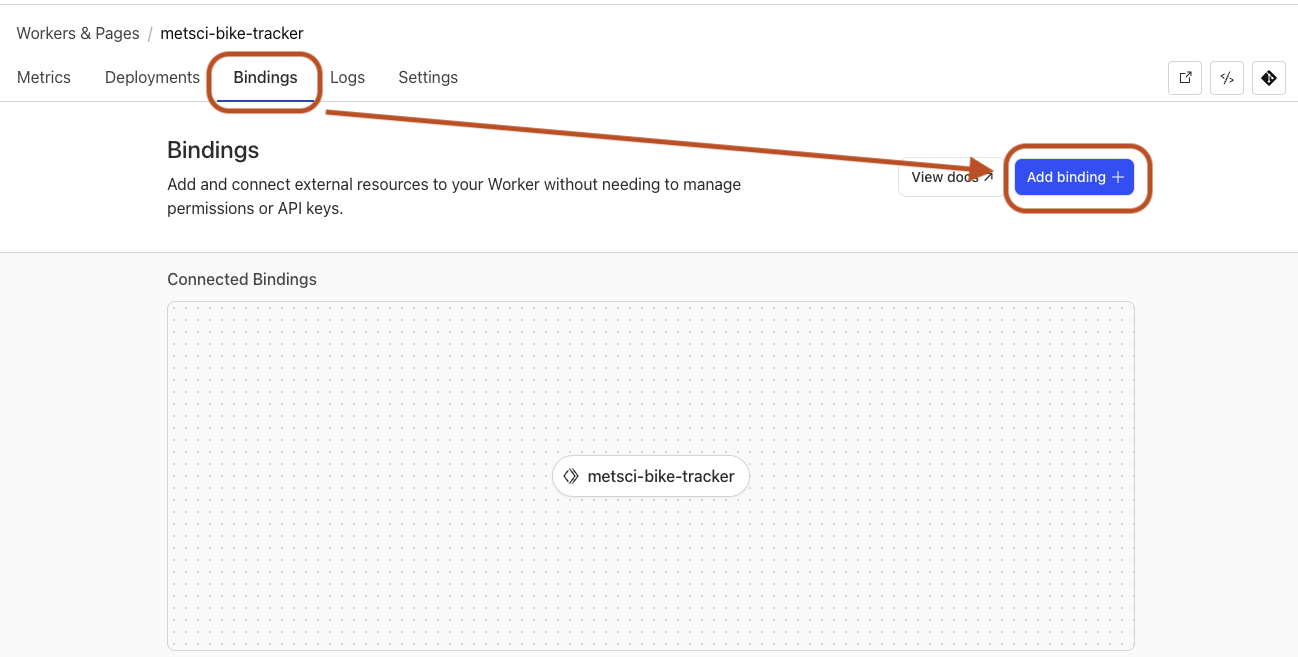
Then choose D1 Database from the list of options, use DB for the Variable name, and select your database, then save or deploy.
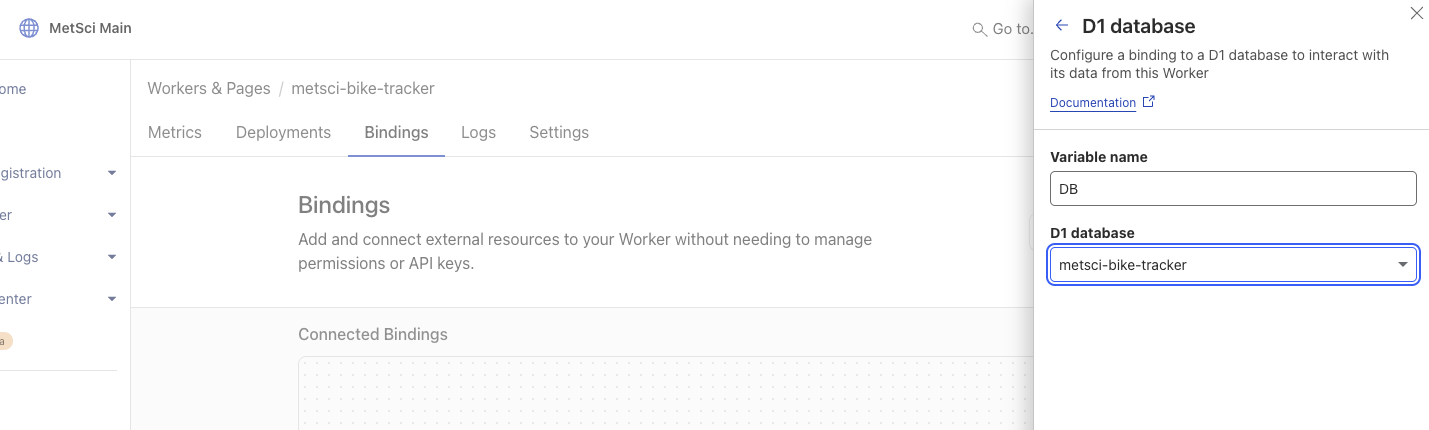
You’ll see a new binding in the Connected Bindings section.
Set Up The Integration in MetSci Console
Cool! The D1 database and the Worker are now set up and connected, ready to receive. All we have to do now is set up the http integration side, check our work, and then let our database fill up with data.
I’ll be using the MeteoScientific Console in this example, which makes it really easy to use the Helium network plus your first 400 data credits are free, which is enough to send one packet an hour for a year! You can use whatever LNS you have.
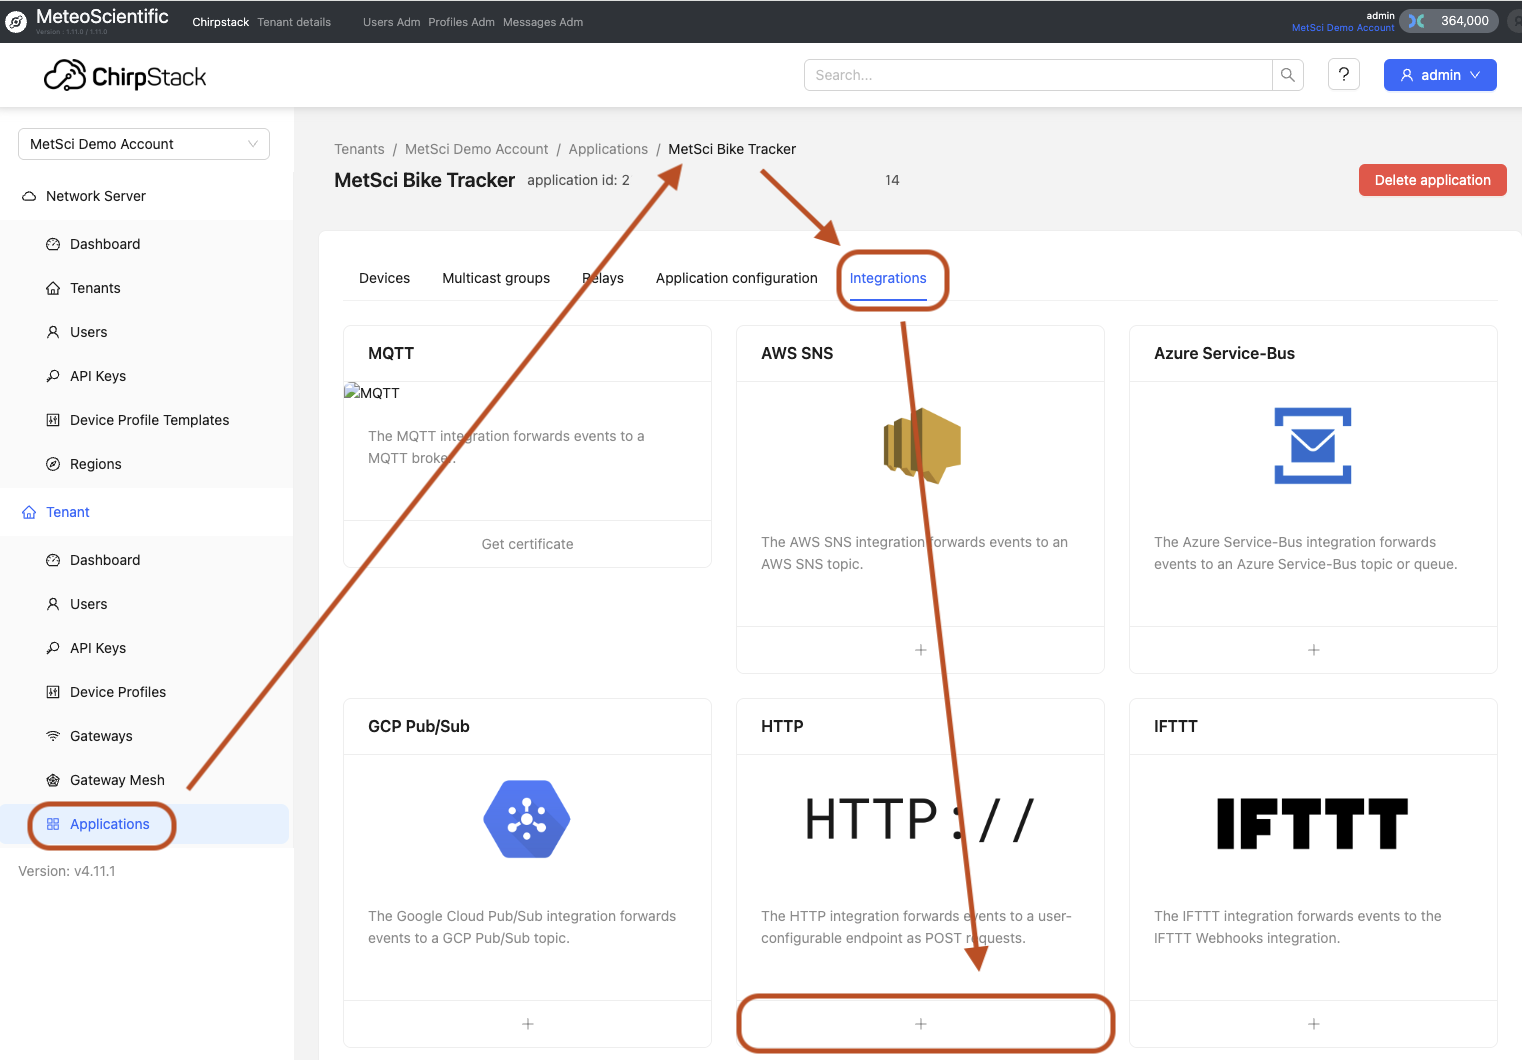
In your MetSci Console, go to your Application, then select the Integrations tab and hit the + on the HTTP box.
Leave the Payload encoding as JSON, paste in the custom Route you set up (for me it was bike-tracker.meteoscientific.com/api/track, then hit + Add header.
For the Key put Authorization, and for the Value put Bearer your-long-Cloudflare-secret.
Don’t forget the Bearer in front!
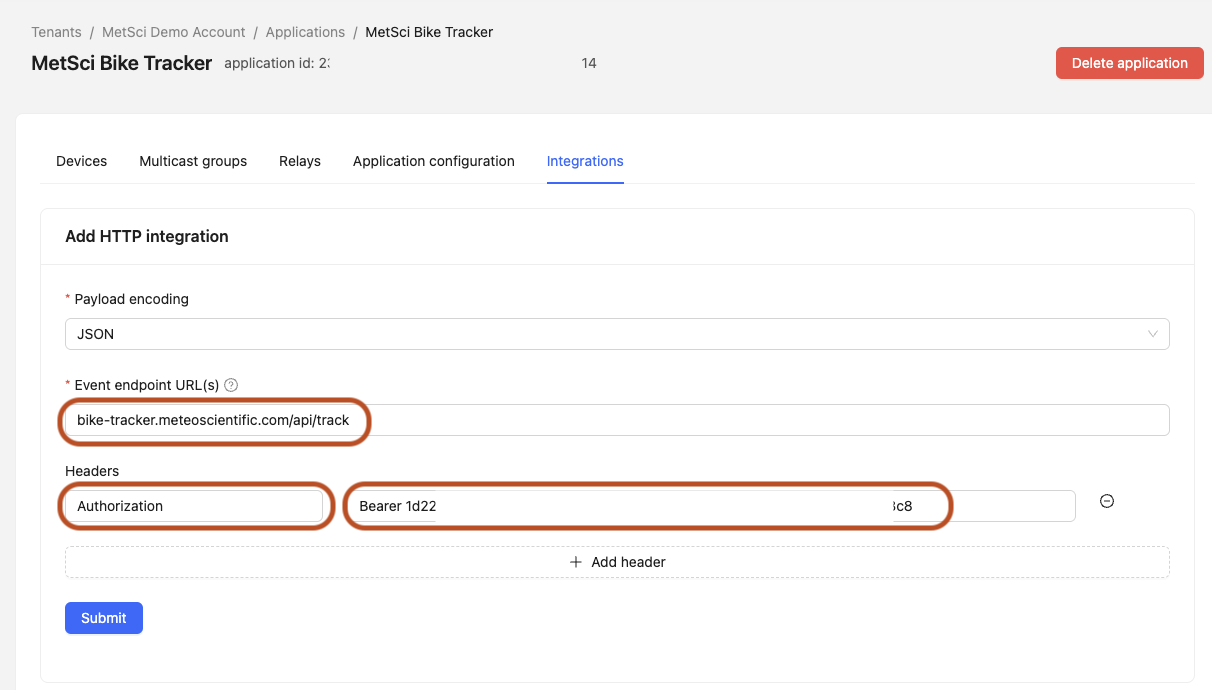
Hit Submit and you’re done!
Confirm Packets
Fire off a few packets from your device and then watch them come in over on the Cloudflare D1.
To see that, from the Cloudflare main menu:
Storage & Databases —> D1 SQL Database —> choose your database
then hit the Explore Data blue button in the top right.
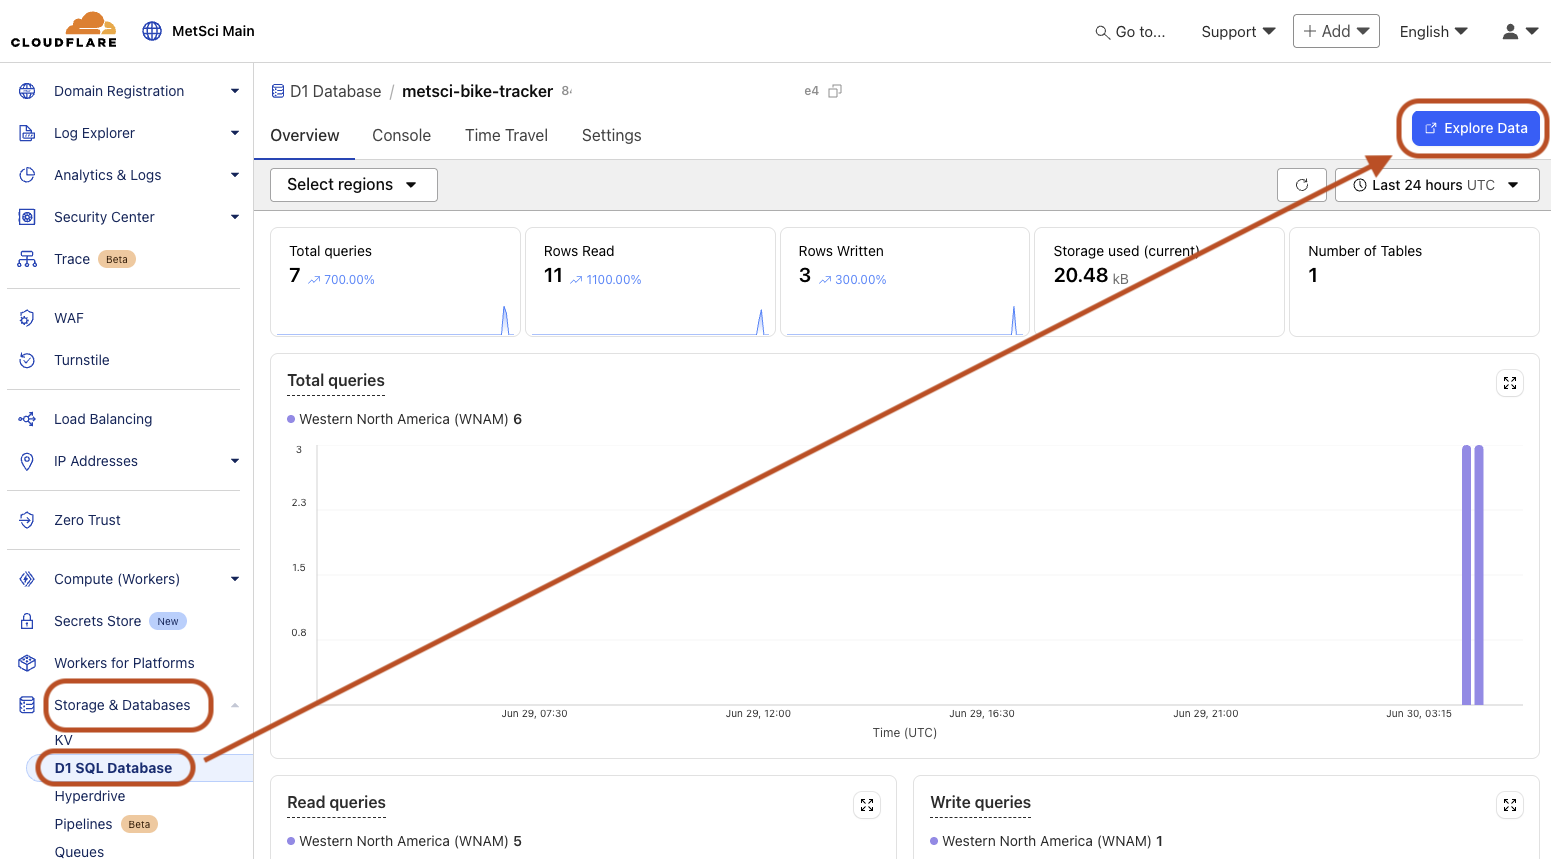
You’ll see the first few rows of data in there (depending on how often your device is firing). Now you have a database storing your data, congrats!

We'll talk about what to DO with your stored data in future tutorials. For now, well done on diving a little further down the rabbit hole of geekery and taking control of your data with LoRaWAN devices.
If you like this kind of dive into LoRaWAN I've got a set of Tutorials for you as well as a podcast. Enjoy the learning, and pass it on wherever you can.
Rock 'n roll!
Nik Hawks is incurably curious at MeteoScientific. He writes to educate and delight people considering IoT, and to inspire other IoT nerds to build and deploy their own projects into the world. He runs The Business of LoRaWAN podcast discussing all things LoRaWAN and is psyched to hear about what you're building, whether it's a one sensor playground or a million sensor rollout.